The ultimate guide: how do I regain control of my iPhone?

Use these 31 smart settings, tips and tricks to make your iPhone work for you – instead of against you
Your favo news app screams that the world is on fire, while a group app – which you’ve been secretly wanting to leave for months – explodes. Meanwhile, you scroll aimlessly across social media. You blink your eyes and…. 30 minutes have passed.
Tell me honestly: how much time a day do you spend on your iPhone? The average Dutch person spends 2 hours and 15 minutes a day behind their smartphone. For 30-somethings, it is much more: 3 hours and 21 minutes a day! It’s not crazy to stop and think about your screen time. Smartphones are known to not have the best impact on our productivity or even our happiness.
Fortunately, there are tips & tricks that will help you regain control of your iPhone. How? By setting up your iPhone so that your rational brain is back in charge. Chances are, right now, the emotional and addictive part of your brain is at the helm when it comes to your smartphone use. Wondering how this works? Here we explain it to you. Or get started right away!
To write this guide, we spoke with several experts: thanks Max (time management trainer & coach), Karen (team trainer smarter working and senior professional organizer) and Marijne (business coach) For the help in writing this guide!
Table of contents
The 31 settings, tips and tricks below are going to help you show your iPhone who’s boss once and for all. For convenience, we have provided a table of contents. Click directly on a topic of your choice or walk through this guide step by step! We have bolded the steps that are really essential to us! Want to return to the table of contents after reading a step? You can easily do so by using the previous option in your browser (the arrow in the upper left corner).
You want to set this up to regain control of your iPhone:
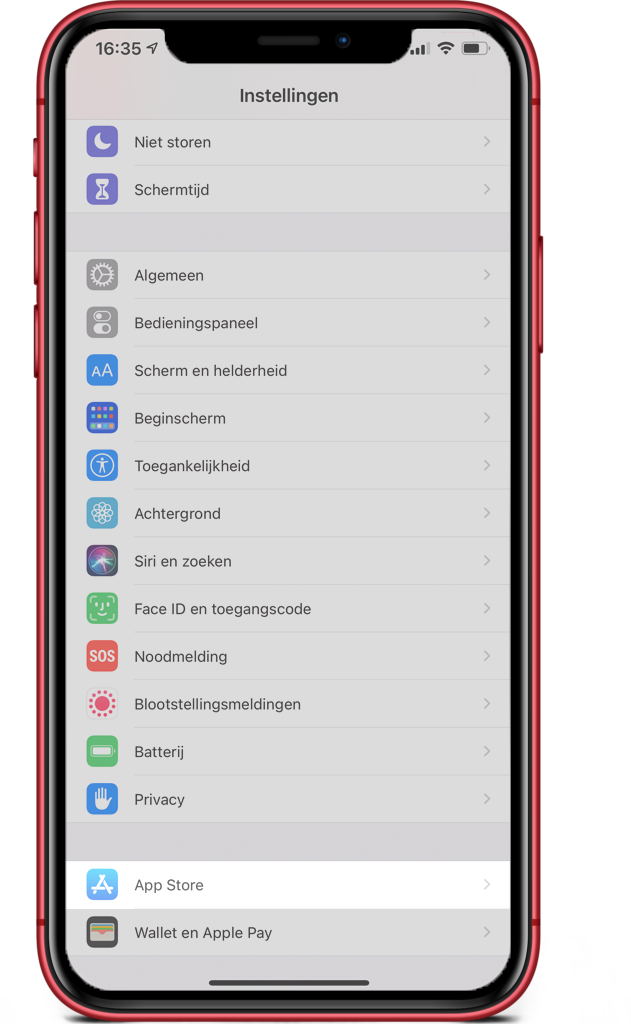
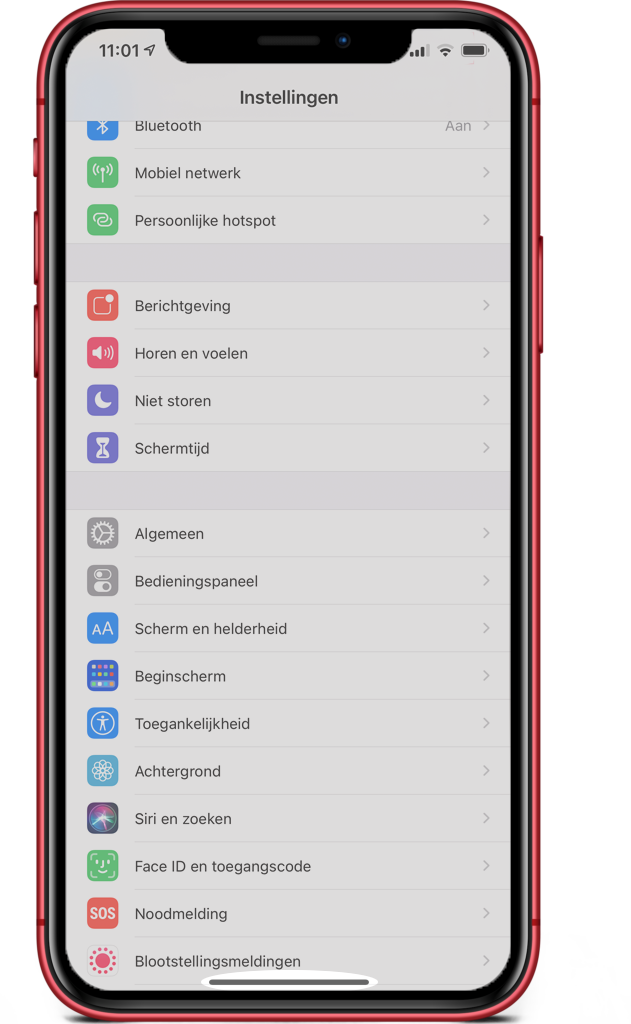
#1: Turn off (all) notifications
#2: Hide or delete apps that don’t make your life better
#3: Put til on to activate off
#4: Turn off app ratings and reviews
#5: Turn on automatic app updates
#6: Use do not disturb mode during work or school
#7: Set Night Shift if you use your iPhone a lot at night
#8: Save your home and work addresses in your navigation app
#9: Download an app to keep your to do’s organized
#10: Set LastPass for all your passwords.
#11: Set up Apple Pay to pay.
#12: Set Bedtime
#13: Set Assignments
#14: Set Widgets
#15: Consider using a cloud backup system
#16: Consider making your iPhone (occasionally!) primal boring
#17: Choose a ringtone per contact
These tips & tricks you’ll want to know to regain control of your iPhone:
#18: Swipe down for the search function
#19: Swipe from top to bottom for your Message Center
#20: Use the control panel
#21: Tap the back twice for a screenshot
#22: Recovery by shaking
#23: Switch quickly between different apps
#24: Close your tabs at once (in the Safari app)
#25: Find closed tabs again (in the Safari app)
#26: Use Respond with text message
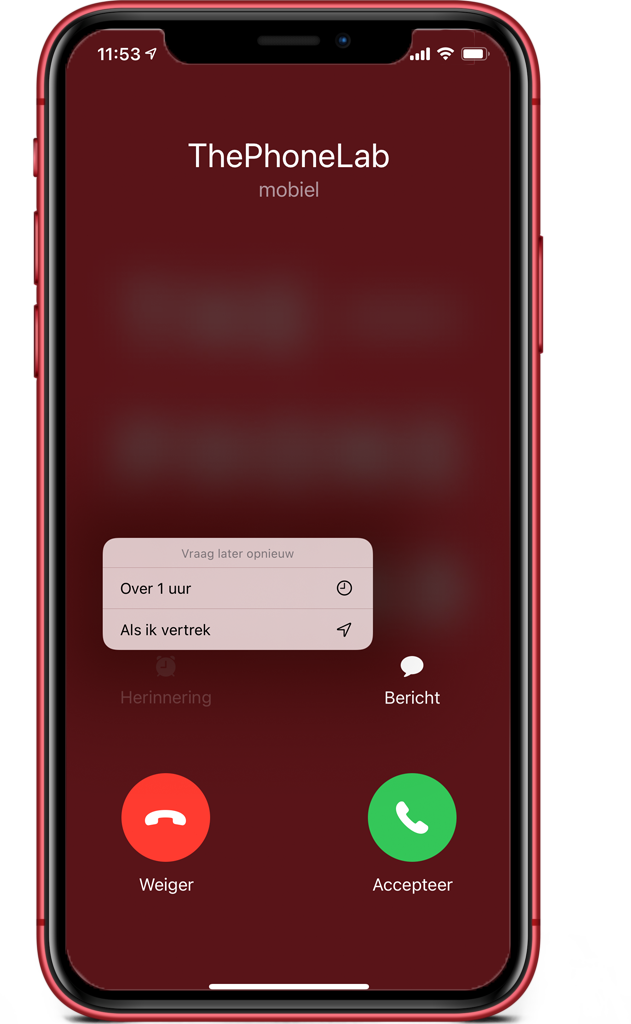
#27: Skip bubbles with Remember Me Later
#28: Use abbreviations for Text Replacement
#29: Learn to type faster
#30: Stop playback with the timer
#31: Swipe into Calculator for backspace option
Background info: how am I affected by my iPhone?
Update: iOS Focus, Do Not Disturb and Bedtime settings
Update: password managers and LastPass
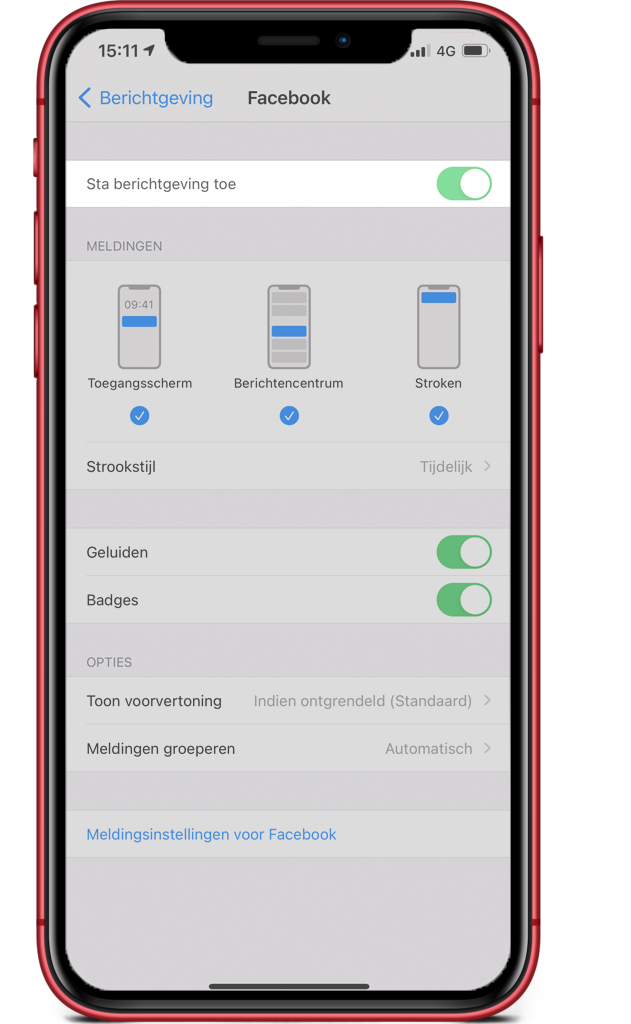
#1: Turn off (all) notifications
Why do you want to do this? Karen (team trainer smart working and senior professional organizer) explains: “when you want to spend less time on certain apps, you actually have to turn off notifications for those apps. When you go on a diet you don’t put the cookie jar next to you all day either, right?”
- Go to Settings > Messaging.
- Under Notification Style you will see all your apps that (can) send notifications.
- Go through these apps one by one and disable your notifications. In doing so, consider the following:
- Don’t want to receive notifications from an app at all? Then turn the switch off at
Allow notifications
. - No longer want to receive notifications from an app on your access screen, but still want to be notified in your Message Center? Then turn on the switch at
Allow messaging
and check only
Message Center
to. Do this with Whatsapp or your mail app, for example.

There are some exceptions for which you want to leave notifications on:
- Apps like Home Delivery, Uber Eats, Uber or ViaVan that give you a notification when your food or cab is at your doorstep.
- Your calendar, of course you don’t want to forget your appointments!
- Navigation apps. In fact, these apps actively send you notifications when you follow a route.
- Phone, FaceTime or other apps on which you receive calls.
- Flitsmeister, so you don’t get flashed when you race down the road at high speed.
- (And other apps you really don’t want to miss notifications from).
And:
- Switch
Badges
off when you allow messaging with an app. These are those (irritating) red circles that appear next to the app icon on your home screen. You do this by turning off the switch at Badges.
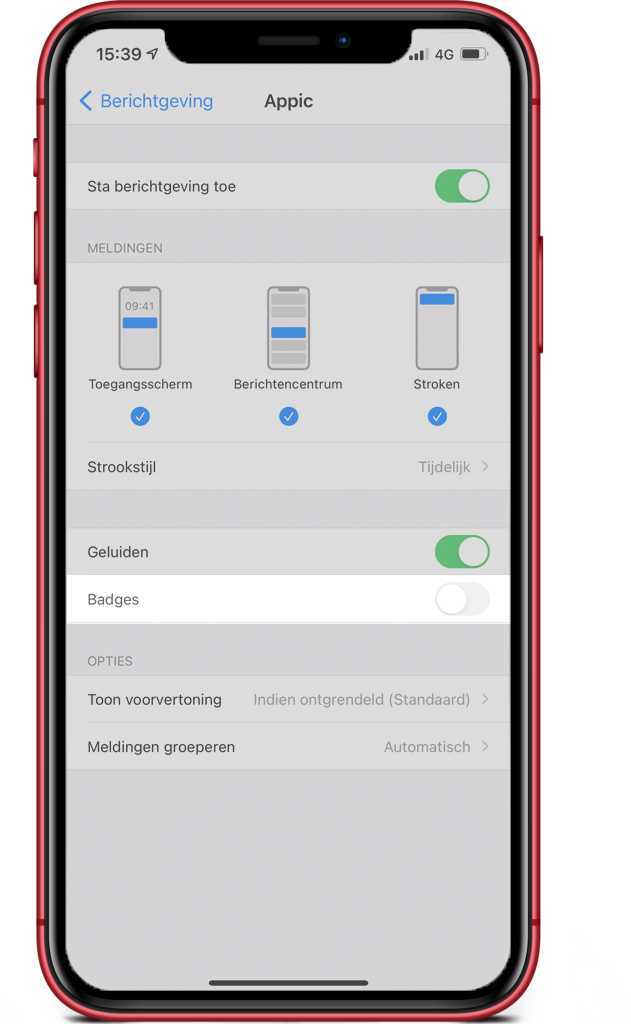
It is tempting at this point to leave your Whatsapp and mail notifications on. Maybe you even have trouble saying goodbye to Facebook or Instagram notifications. We encourage you to give this critical consideration. You can check your social media a few times a day. It is unnecessary to be constantly reminded of it. Do you use Whatsapp for school or work? Then you can choose to leave notifications for this app on. Or only check in your Message Center. In the previous roadmap, we explain how to set this up.
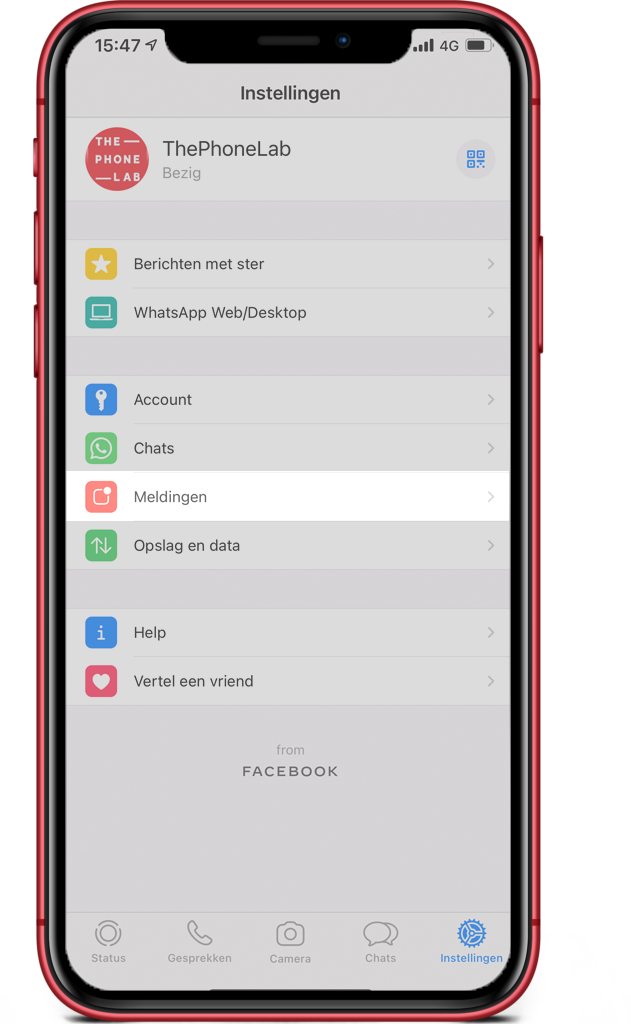
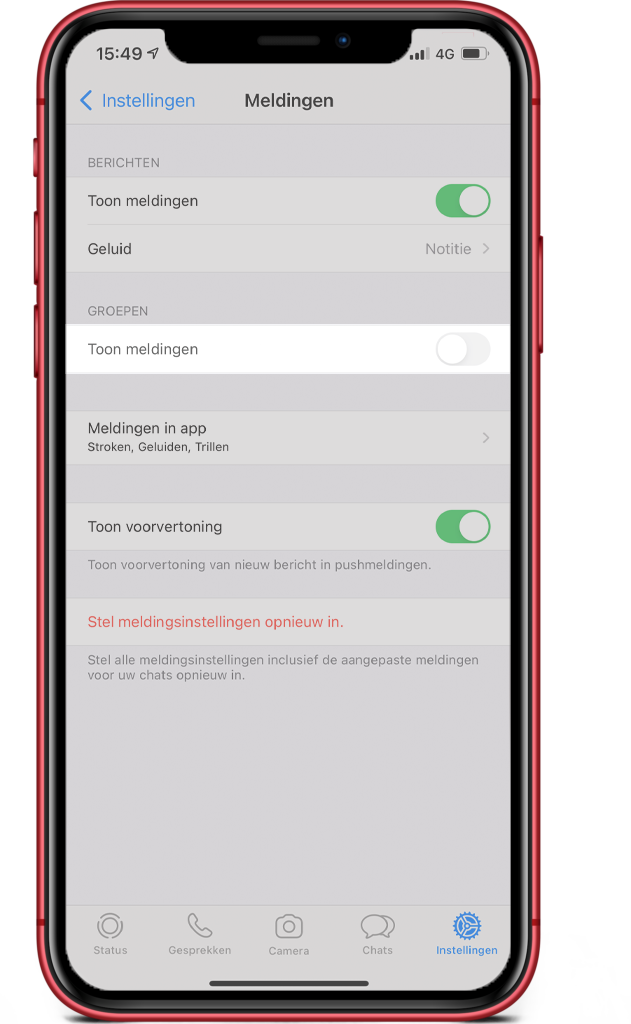
Do you choose not to turn off your Whatsapp notifications? Then it’s a good idea to turn off notifications from group apps, though. Here’s how to fix this:
- Go to Whatsapp and at the bottom right click on Settings.
- Go to Notifications and look at Groups.
- Turn off the switch at Show notifications.
#2: Hide or delete apps that don’t make your life better
It cleans up and is less likely to distract you! You can choose to:
- Uninstall apps: app is removed from your iPhone. Do you still want to use it again? Then you have to download it again.
- Apps to remove from your home screen: the app remains on your iPhone. You can still find it via the search function or in your App library.
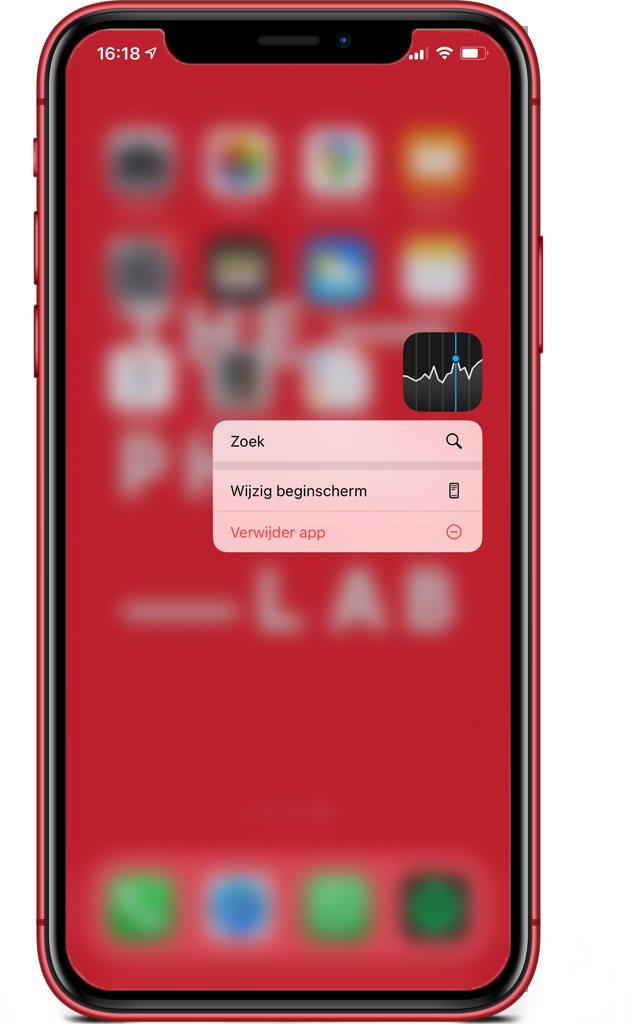
Here’s how to fix this:
- Go to your home screen (where all apps are).
- Choose an app, click on it and hold for a few seconds.
- A menu now appears next to the app. Choose
Change home screen
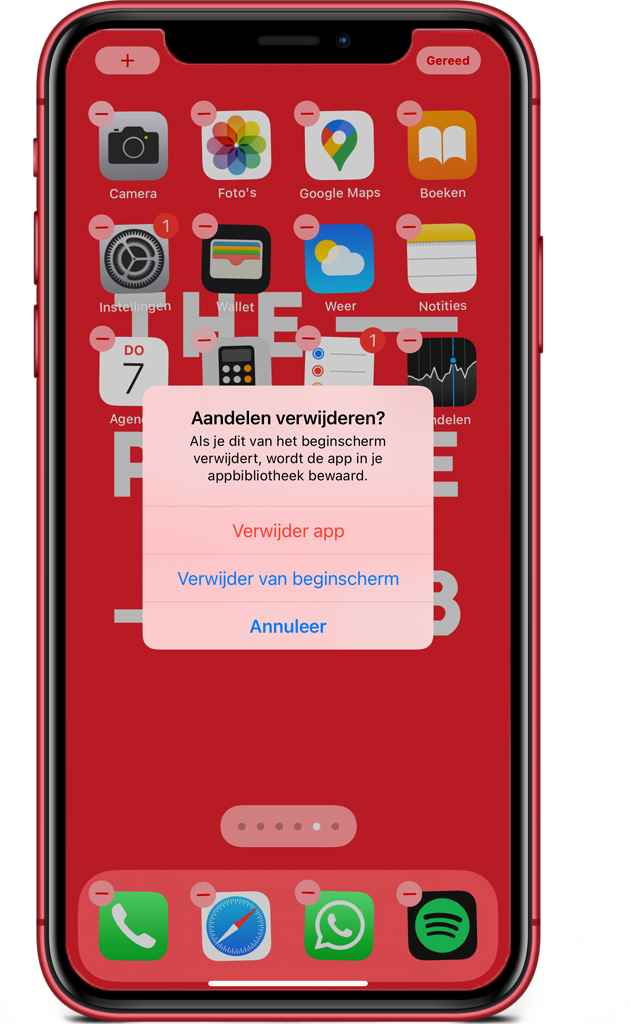
. - The app icons will vibrate, in the left corner of each icon you will see a – sign.
- You can now delete or remove apps from your home screen.
Clean up your home screen
Removed everything? That cleans up nicely! And so you go one step further:
- Create folders by dragging one app on top of another. For example, create folders for social media and drag them to the very last screen. This makes you less likely to be distracted.
- Instead, put your first screen full of apps you like (and use often).
- Or don’t create folders, but use the search function and the App Library. Nice and efficient!
Consider deleting your mail app
Max (time management trainer & coach) gives the tip to delete the mail app: “You’re going to check it unnecessarily often and it’s never actually urgent. Instead, check your mail at several (fixed) times during the day. Just as usual on your laptop.” If you check your mail on your iPhone you are less likely to respond immediately. Max: “Then you check it out of curiosity and respond later on your laptop. You probably then re-read the email. And that’s a waste!” His tip: read the email and respond immediately: “Then it’s out of your head and you manage your time smarter.”
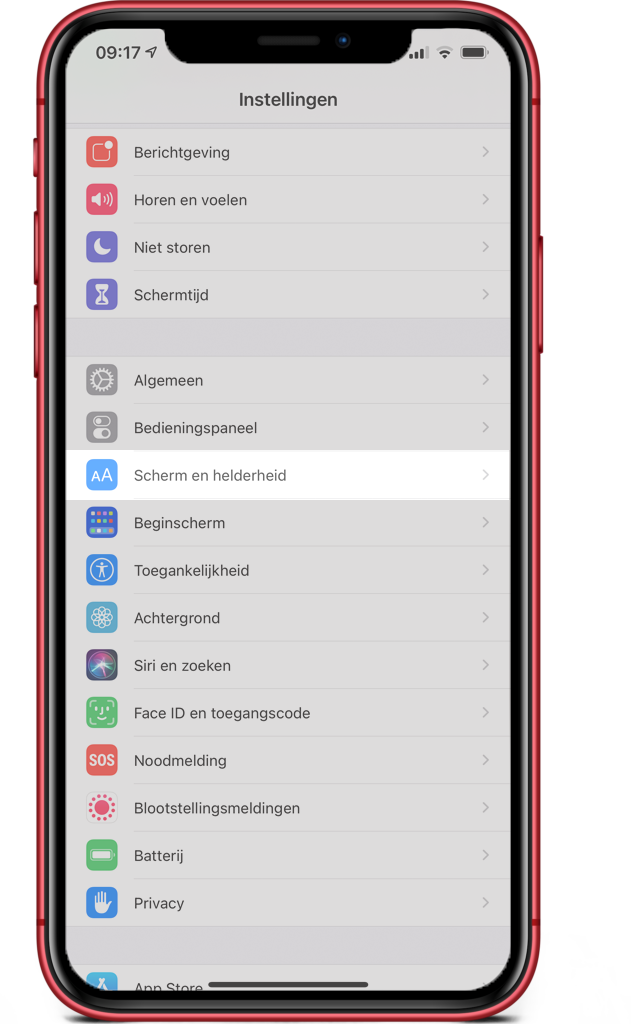
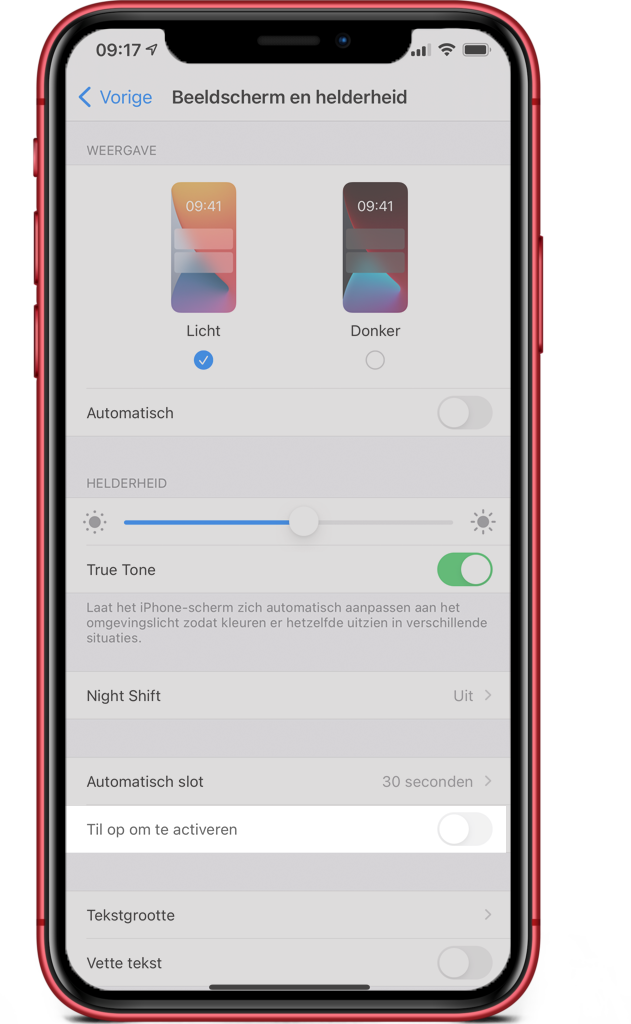
#3: Put til on to activate off
Your iPhone is set up so that the screen “lights up” when you pick it up. This will trigger you to check your notifications every time you pick up your iPhone. And you don’t want this, do you? Because you are in charge of when you do or do not use your iPhone!
This is how you turn this off:
- Go to Settings > Screen and Brightness.
- Turn off the switch at Lift to activate.
#4: Turn off app ratings and reviews
Have you ever written an app review? My guess is no. So turn off those irritating notifications as well:
- Go to Settings > App Store
- Turn off the switch at Ratings and reviews.

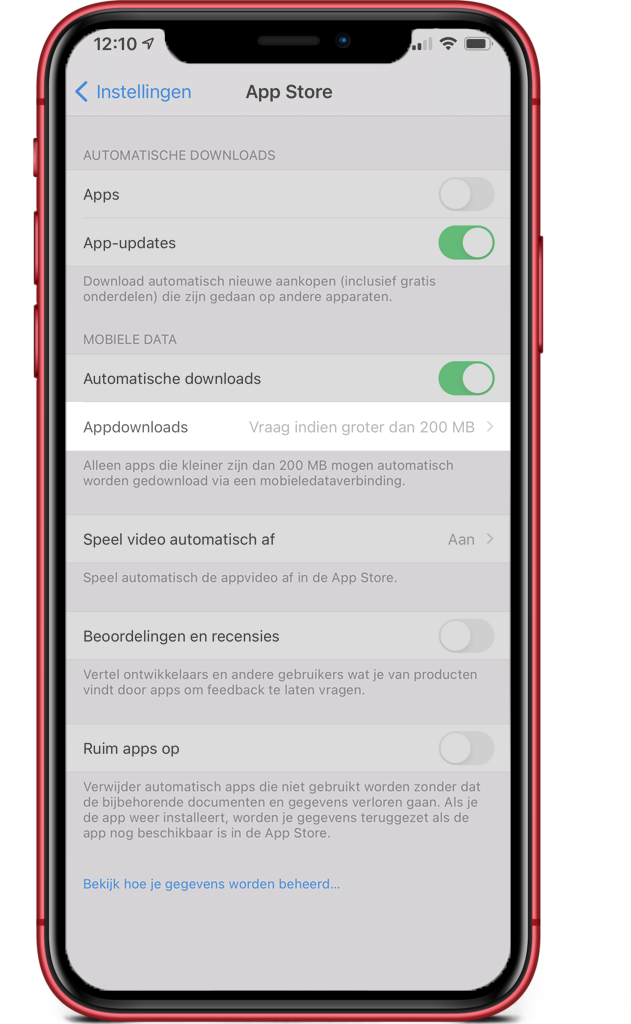
#5: Turn on automatic app updates
Your apps need to be updated from time to time to keep working optimally. This can also be done automatically. Then you don’t have to look at this anymore. Here’s how to set this up:
- Go to
Settings
>
App Store
. - Look under
Automatic downloads
and turn on
App updates
on. - Want your iPhone to perform automatic downloads even when you’re not on WiFi? Then check out
Mobile data
and set the option
Automatic downloads
on. - Don’t have an unlimited data plan? Then choose a suitable preference at
App downloads
. Don’t know which choice to make? Check the explanation below.
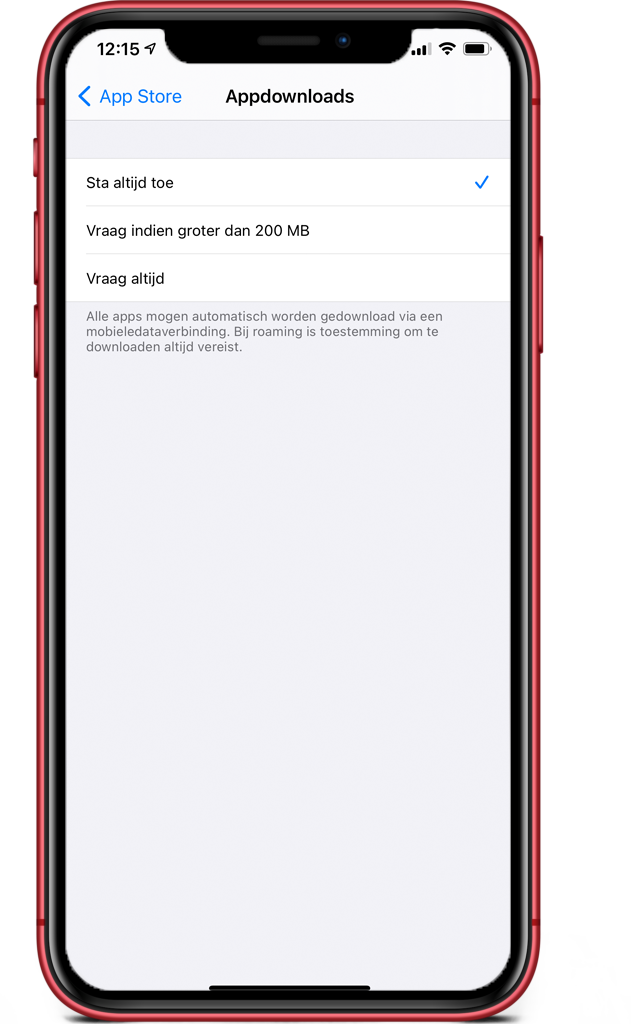
Automatic downloads
We recommend the following:
- Do you have an unlimited data plan? Then choose the option
Always allow
. - Don’t have an unlimited data plan but have a generous plan that you never really go over? Then choose
Question if larger than 200 MB
. - Do you have a reasonable amount of MBs but occasionally go (almost) over them? Then choose the option
Always ask
. - Do you struggle with your MBs every month and log in almost daily to check how many you have left? Then turn this option off by selecting under
Mobile data
the switch at
Automatic downloads
turn off. Your iPhone now performs automatic downloads only when connected to WiFi.
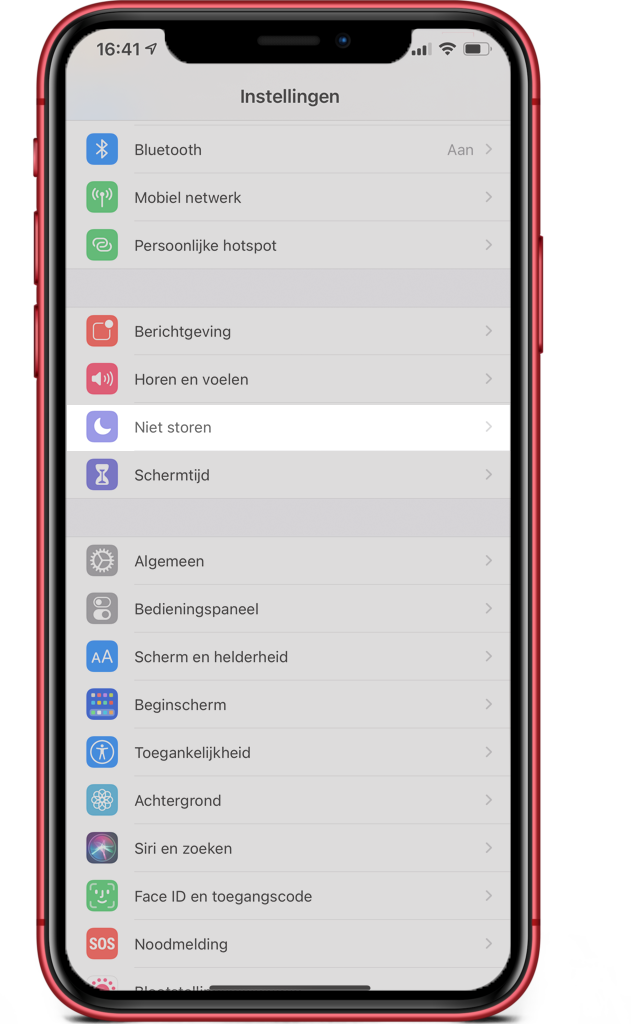
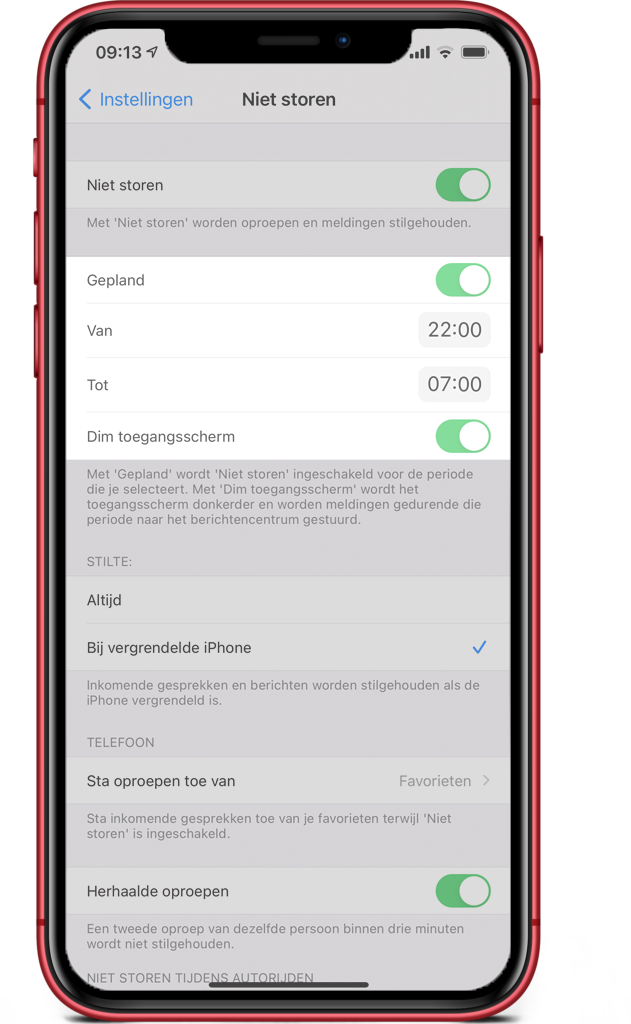
#6: Use do not disturb mode during work or school
Marijne (business coach) indicates that you boost your concentration and productivity especially when you put your iPhone away completely. Good idea! But sometimes you do want to use your iPhone (for example, to listen to music) while not being disturbed by calls. That’s what the do not disturb mode is for. With this mode, calls and notifications are kept silent. And this is how you set it up:
- Go to Settings > Focus.
- Turn on the switch at
Do Not Disturb
.
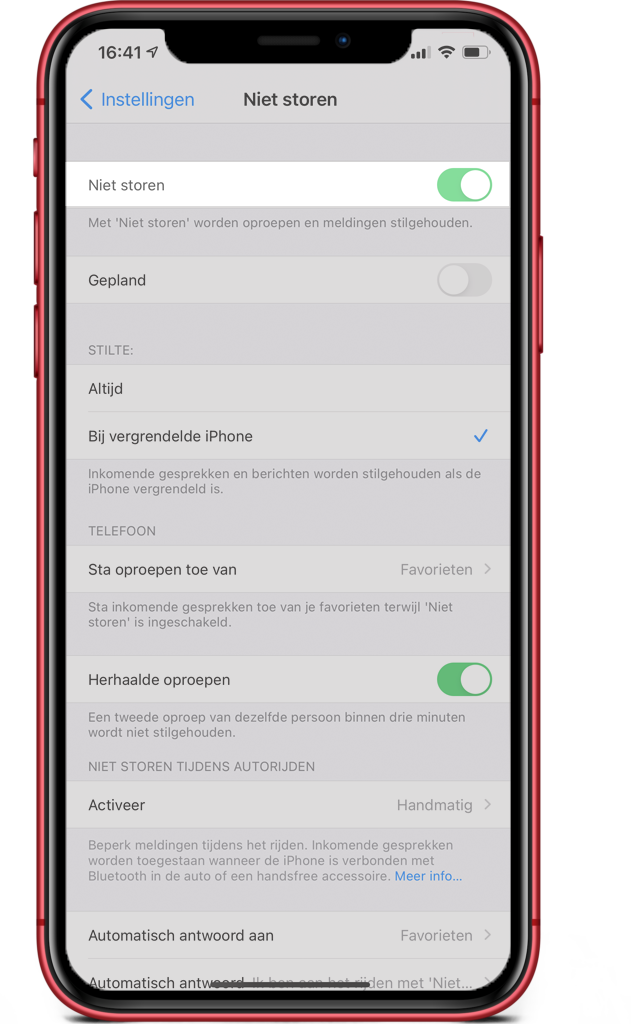
Staying accessible to key people
When you turn on the do not disturb mode, you no longer receive calls and notifications. So do this only when you want to and not when you want to be reachable. Do you want to be accessible to some contacts; such as family, friends or colleagues? You fix that like this:
- Check in
Settings
>
Do not disturb
or at
Allow calls from
your
Favorites
are selected. This is important, otherwise the next steps will be useless! - Now go out of
Settings
and go to
Contacts.
- Go to the bottom left
Favorites
. Select the + button at the top left. - Choose a contact and click on it. Then choose
Call
. If desired, do the same for
Message
and
Video
.
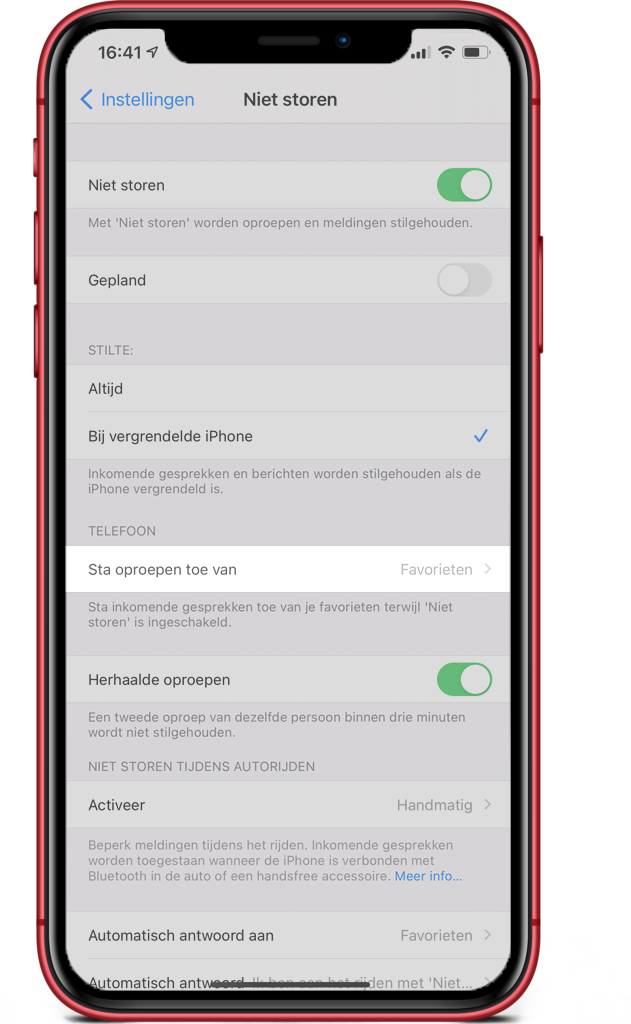
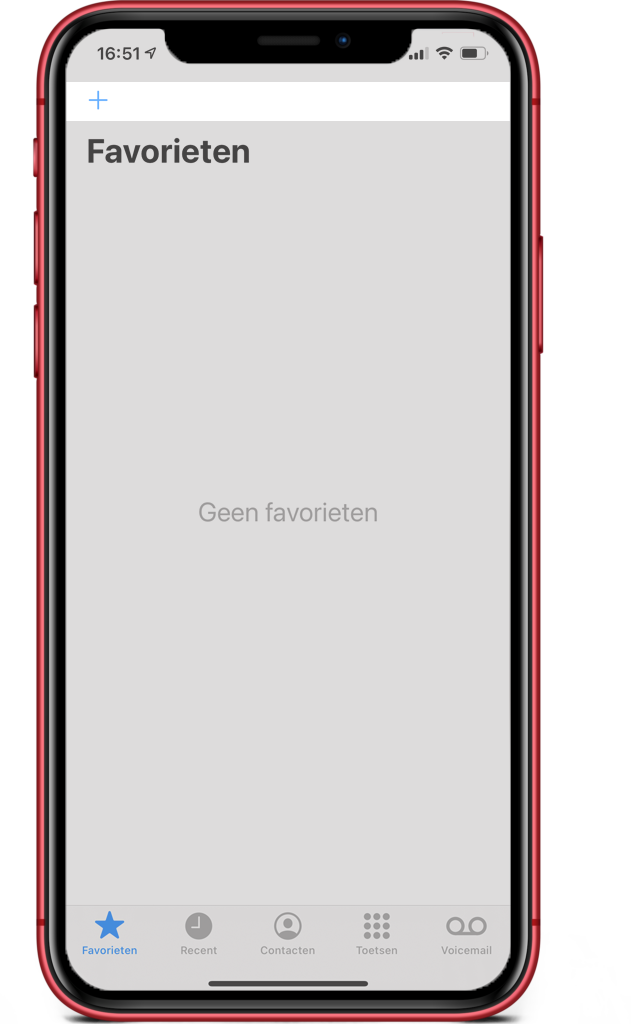
This way, your favorite contacts can still reach you when the do not disturb mode is on.
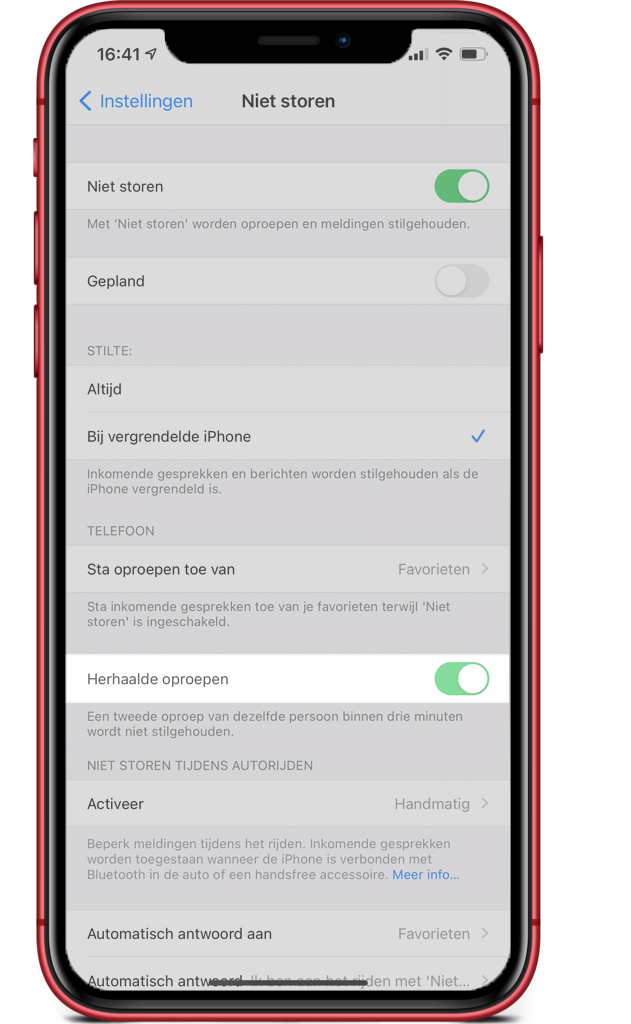
Staying reachable for key calls
Do you want to be reachable when there is a real need? Then enable the following option. Thus, a second call within three minutes from the same person is not kept quiet. In short: if someone really wants to reach you, your iPhone just rings.
- Check in
Settings
>
Do Not Disturb
whether the switch is on at
Repeated calls
. Turn it on if desired.
Quickly enable do not disturb mode
It’s cumbersome to go to your
Settings
app to go to turn do not disturb on and off. You do this faster in the following way:
- Go to your home screen and swipe down from the top right corner (iPhones without home button) or swipe up from the bottom of your screen (iPhones with home button). The control panel now opens.
- Click on the crescent, the do not disturb mode is now on.

Schedule when do not disturb mode is enabled
You can schedule the do not disturb mode. For example, when you go to work, sleep or learn at set times. You do this as follows:
- Go to
Settings
>
Do not disturb
and turn on the switch at
Scheduled
. - You can now create a
From
and
To
set time. Choose logical times here, such as when you go to bed until the time you get up again. - If desired, also enable
Dim access screen
Enable. This will keep your iPhone from lighting up in the middle of the night.
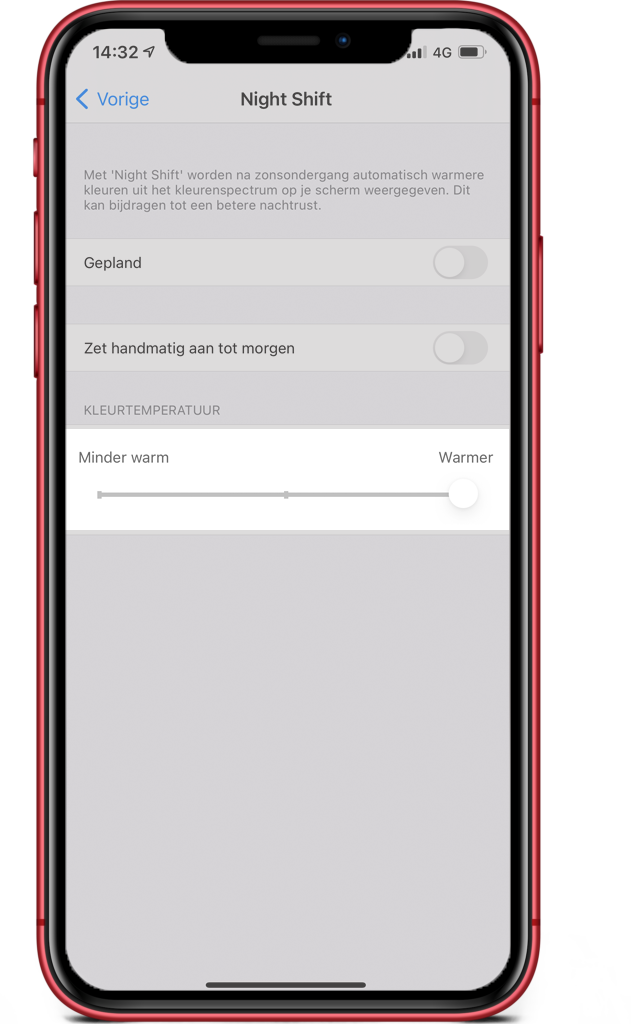
#7: Set Night Shift if you use your iPhone a lot at night
Less blue light can contribute to better sleep. This is because blue light prevents the production of melatonin (the substance that makes you tired). And Night Shift is a setting that filters blue light. Only warmer colors from the color spectrum are displayed on your screen. This may make you sleep a little better:
- Go to
Settings
>
Display and Brightness
. - Choose
Night Shift
and turn on the switch at
Scheduled
. - Choose
From To
and fill in
Adjusted Schedule
two hours before bedtime and the time you get up again. - You can also choose to
Sun down to sun up
select. For example, this option works well when you change bedtimes often (or just don’t feel like thinking).

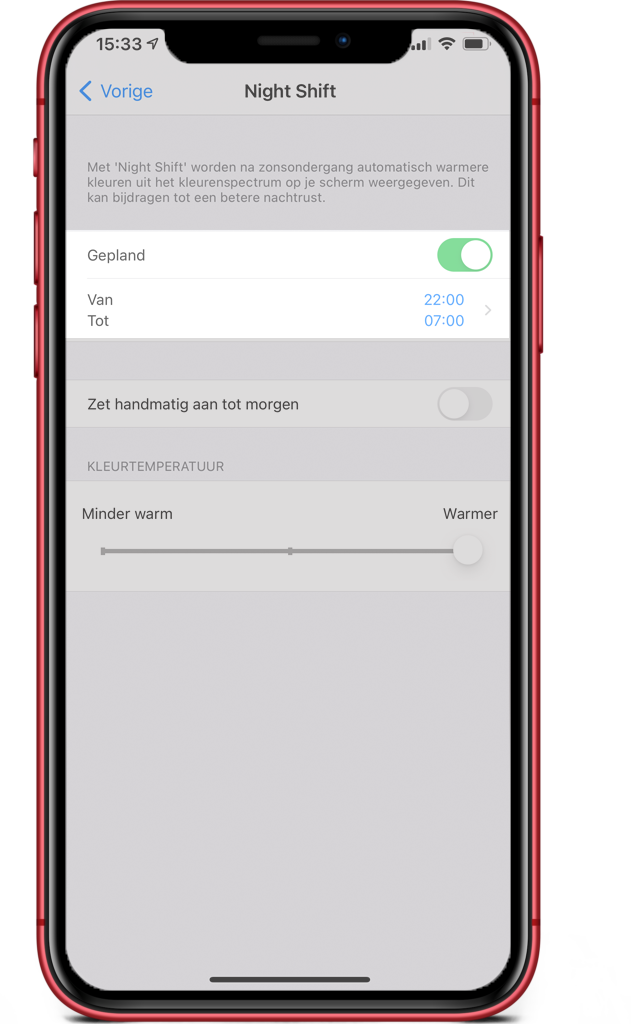
To take full advantage of the benefits of Night Shift, you must filter out all blue light from your screen. You can do it like this:
- Check in Settings > Display and brightness > Nightshift the option Color temperature.
- Slide the circle on the bar all the way to the right. The circle is now under the word Warmer.
This fierce version of Night Shift probably takes some getting used to. Give it a week, who knows, you might sleep like a baby! And if you don’t notice as much effect, you can always make the color temperature less warm. From my own experience, I can tell you that you get used to this warm color spectrum; I myself no longer notice it when my iPhone switches to Night Shift at night.
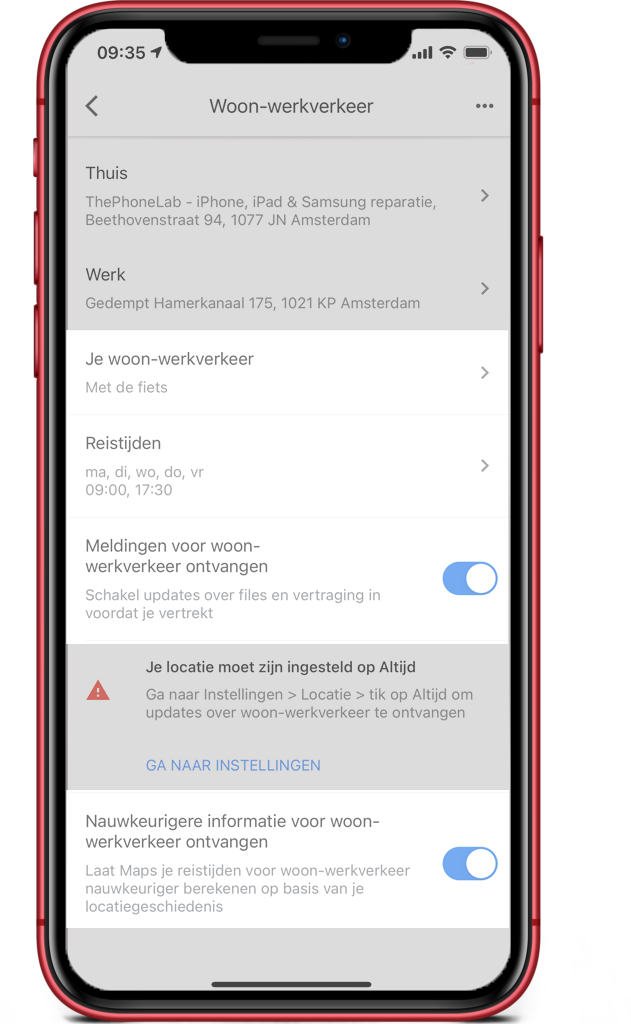
#8: Save your home and work addresses in your navigation app
So you can navigate home or work even faster! These are three good navigation apps:
- Google Maps: because you get notifications regarding your commute. In addition, you can always choose a bike route; not entirely unimportant in our – bike lane-laden – chilly country!
- Apple’s Maps: because it syncs with your contacts’ addresses.
- Waze: Flashmeister and a navigation app in one. And the “flashmeister” function itself works even better abroad than with the real Flashmeister app.
It’s up to you which navigation app you want to use.
Saving your home and work addresses in Google Maps
- Go to
Google Maps
and click on your profile picture at the top right of your screen. This is probably a self-selected photo or your initial. - A menu unfolds, click on
Settings
. - Click on
Commuting
. - Click on
Home
and enter your home address, click
Done
. - Click on
Work
and enter your work address, click
Done
.
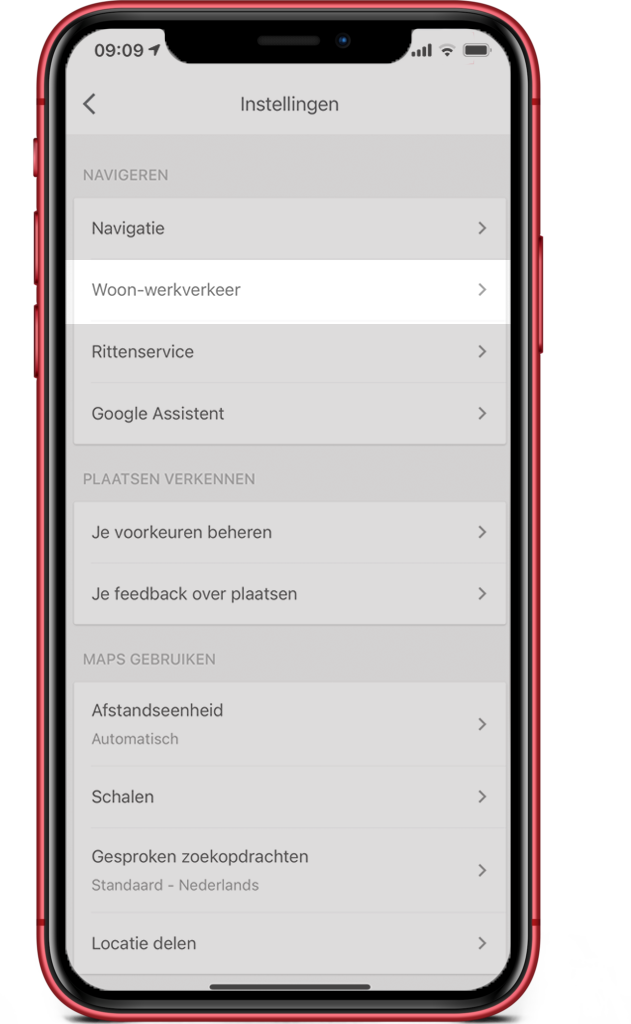
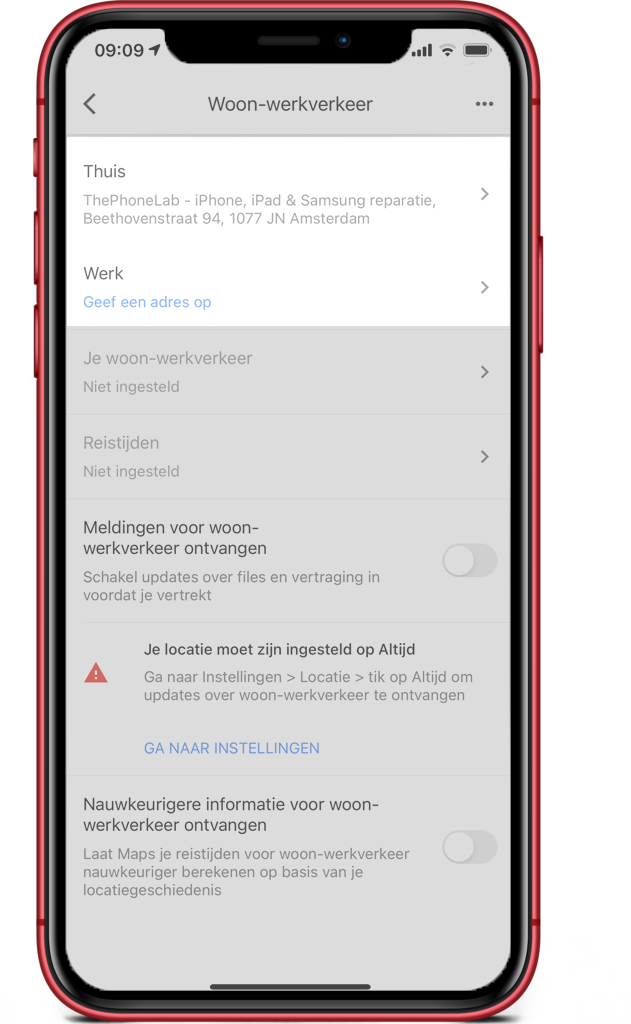
Do you open the Google Maps app? Then you can now navigate directly to home or work. You can quickly find these locations under your search bar.
Do you often travel from work to home and back again? Then you must hate it when you only see on the platform that your train has been delayed. And can you whine when you drive straight into a traffic jam. It is helpful to know in advance that such setbacks are on your itinerary. So you can catch another train or take a detour. Google Maps has an option for that:
- Go to
Google Maps
and click on your profile picture at the top right of your screen. This is probably a self-selected photo or your initial. - A menu unfolds, click on
Settings
. - Click on
Commuting
. - Click on
Your commute
and select how you usually commute to work. Click on
Done
. - Click on
Travel times
and fill in the days you work, when you arrive and when you leave again. Click on
Ready
. - Turn on the switch at
Receive commute notifications
. - Want to receive the most accurate notifications? Then also check the option
Receive accurate commute information
on.
Saving your home and work addresses in Apple’s Maps
- Go to
Maps
and look at
Favorites
(under the search bar). You should see here
Home
and
Work
are listed. - Click on
Home
and click on
Open my contact card
. You now see your own contact card. Go to
+ add address
. - Enter your home address and click again on
+ add address
. Enter your work address here and click on top right
Done
. - Your home and work addresses are now taken over by Maps.
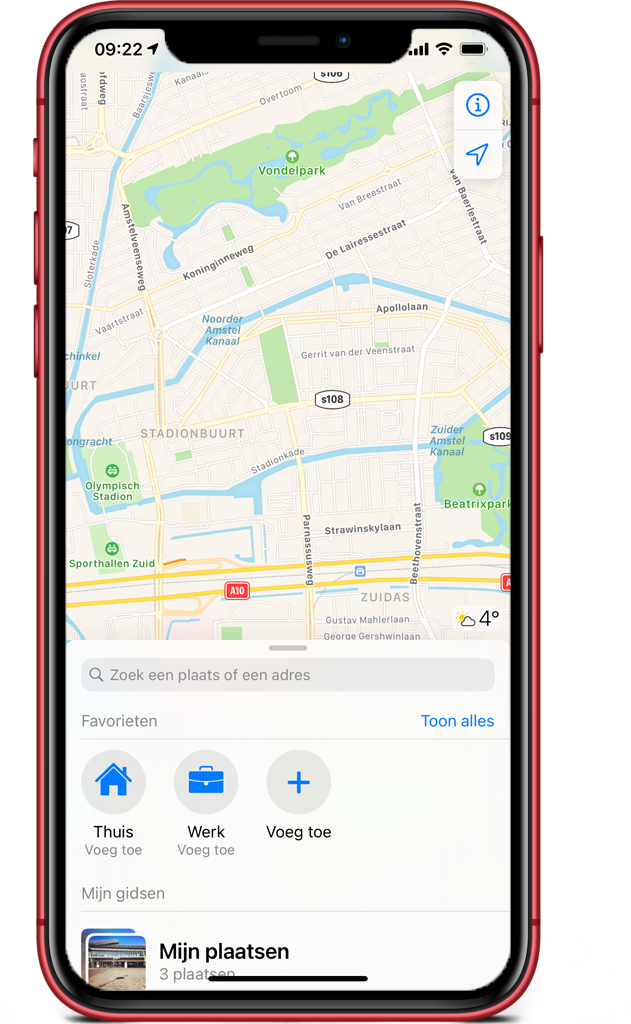
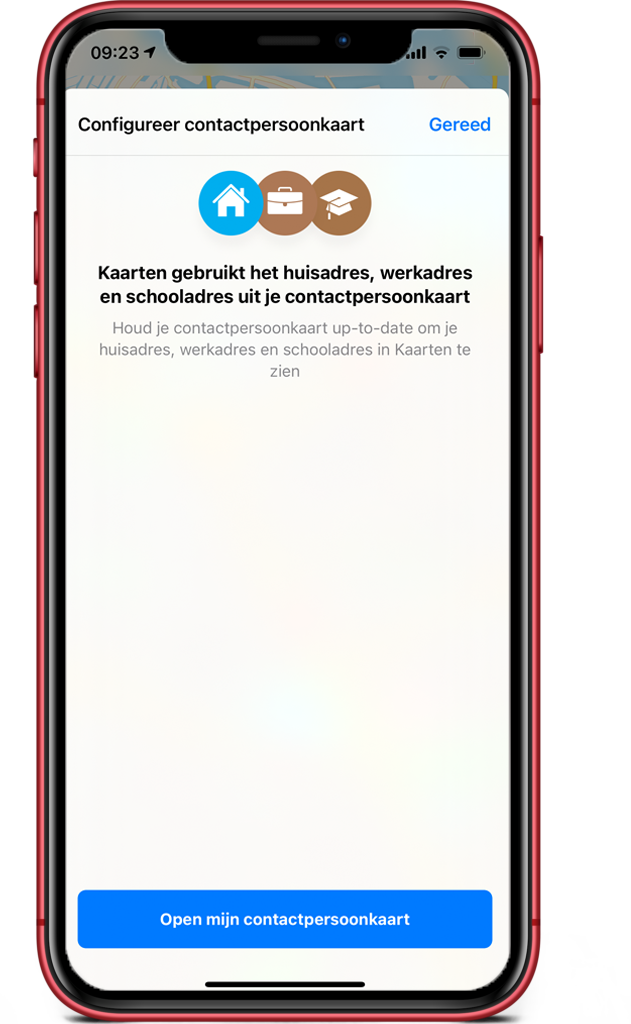
Open your
Cards
? Then you can now navigate directly to home or work. In fact, you can quickly find these locations at
Favorites
(under your search bar).
Saving your home and work addresses in Waze
- Go to Waze and click on the magnifying glass at the bottom left.
- Click on Home and enter your home address. Click it and click Set home and go.
- Repeat the same steps but with Work. Enter your work address here.
#9: Download an app to keep your to do’s organized
So you don’t forget anything and always have your to do’s in your pocket!
Reminders (free)
This is a very basic to do’s app. Personally, I use this app when I want to quickly get something out of my head and into my iPhone. I am especially a fan of the feature to have a reminder displayed the moment I arrive at a location. Think of memories like:
- Taking package to the post office, when I arrive home.
- Sending colleague an email, when I arrive at work.
- Buying detergent, when I enter the supermarket.
Trello (free)

Trello; the golden oldie in to do lists land. This is how you can use it:
- On one board, make a list called
To do
, a list called
Doing
and a list called
Done
. - You start by placing all your to do’s under To do’s. Then you get started. Drag the tasks you are working on to Doing. The tasks you complete drag and drop to Done.
- This allows you to see what you are working on (isn’t it too much, are you keeping track, are you working most efficiently this way?) and what you have already completed. Visualizing can teach you!
Things 3 (€10.99)
The true productivity freak must have seen this app for a while. One of the giga advantages of Things 3 is that the app stays “tidy” very easily. With minimal effort, the overview remains maximum. Things 3 stands out because:
- You can link your to do’s and lists to a time and date. As a result, your to-do’s app is also instantly a sort of calendar. You have a Today list in which you will find an overview of everything you need to do today. In addition, you can navigate to Upcoming. Here you will find your schedule and tasks for tomorrow and the days after. That way you won’t get tired today with tomorrow’s problems ;-).
- You can also check the list
Anytime
list: these are tasks to be completed, with no hard deadline. - Sometimes something comes to mind; a task that you don’t need to perform immediately but is interesting to take up at some point. This paste into your list Someday. Need inspiration? Then you can click on this list and easily find the information.
- Curious about your accomplished tasks and goals? Then check out the
Logbook
. Here you will find all your completed tasks. - And more is possible. Check for an in-depth review of the app in
this video
.
Braintoss (€3.49)

On the recommendation of Karen (team trainer smarter working and senior professional organizer) we came to this app. Karen: “You can really use a smartphone to your advantage! A good example is
Braintoss
. You speak your to do’s here. Then they appear in your inbox.” This keeps your head from overflowing with things to remember. “For example, I use it when I lie in bed at night and think I need to remember something for tomorrow,” Karen said.
#10: Set LastPass for all your passwords.
This prevents you from spending time resetting passwords because you forgot them again. Or worse, that you lose access to accounts altogether.
Lastpass (free)

Download the
LastPass Password Manager
app. In your safe you can keep all your passwords. LastPass recognizes when you need to enter a password in an app or in Safari and gives you the option to enter the password immediately. So you only need to remember one password; namely, that of your LastPass account!
There are two biases for not using LastPass:
- You use Apple’s Keychain and you’re fine with that.
- You fear that LastPass is insecure and therefore prefer to store your passwords in your head or with pen and paper.
But this will probably convince you:
- Apple key fob works only on Apple devices. Do you use an iPhone but work on a laptop running Windows? Then the Keychain function does not work on that laptop. LastPass you can integrate into all browsers and on your iPhone. So you can easily access your passwords from all your devices.
- Every time you try to log in LastPass at a different location or via a different device, you have to accept it via email. Suppose you always log in from your home address and try to get into your LastPass account at work? Then LastPass will recognize that you are trying to log in at a new location. You will receive an email requiring your permission to do so. Only then can you also log into your vault at the new address. Mega safe so!
#11: Set up Apple Pay to pay.
Wallet (free)
Never having to search for your debit card again? Or are you one of those people who regularly forgets his or her wallet? Then use Apple Pay:
- Go to the Wallet app and click on the + at the top right.
- Click on Continue and add your card of choice. For example, your debit card.
- Follow your bank’s instructions.
You can now pay with your iPhone. Is your iPhone locked? Then press the unlock button twice and your digital debit card pops up. Through Face ID you can pay directly. Doesn’t this work? Then enable this via Settings > Face ID and access code >
Use Face ID for >
and switch
Apple Pay
enable.
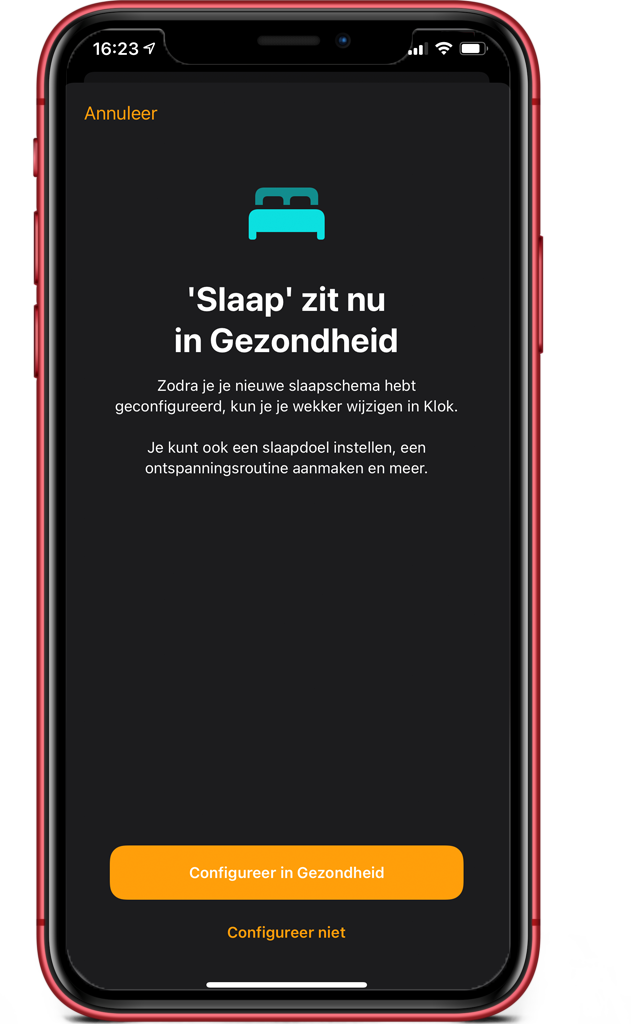
#12: Set Bedtime
Do you struggle to maintain a regular sleep rhythm? And do you like to be woken up by whistling birds? Then make use of
Bedtime
:
- Go to
Clock
and look at
Sleep | Rise
. Click on
Change
. - Click on
Configure in Health
. Click on
Next
. - Set a sleep goal, for example, 8 hours. Click on
Next
. - Set your first schedule. Choose the days your schedule should be active (for example, weekdays). Then choose your bedtime and time of rising. Make sure the schedule meets your sleep goal. The slider then turns dark gray instead of orange.
- Scroll down. Turn on the switch at
Wake-up alarm clock
. - Choose at
Hear and feel
your desired alarm clock sound. My favorite is
Birdsong.
Are you a regular sleeper? Then choose a slightly louder sound. And click on
Previous
. - Then click (top right) on
Add
>
Next
. - After this, you can choose to
Sleep mode
,
Relax mode
and
Commands
Enable. Enable if desired. - Check your sleep goal and click
Done
.

You now receive a notification when you need to go to bed and your alarm goes off when you need to get up.
Latest iOS: Bedtime is often called Sleep and is in Health
See you in the Clock app no Sleep | Rise more like the one below? Then set this via the Health app.
- Go to Health > Sleep.
- Choose Set sleep or adjust your Schedule Customize.
- Set your Sleep Goal, Bedtime and Alarm Clock as you wish.
#13: Set Assignments
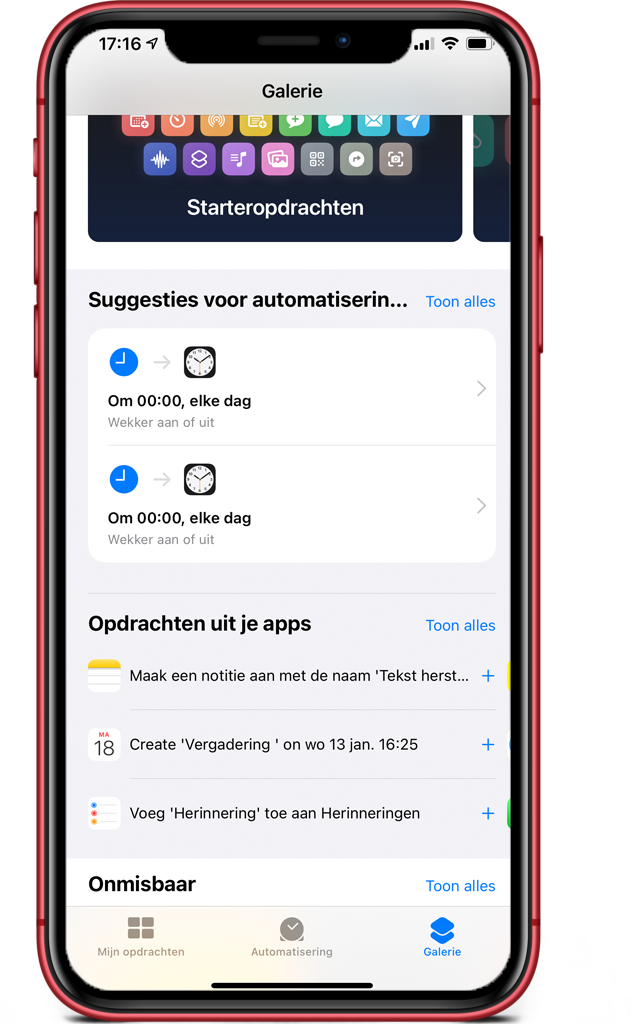
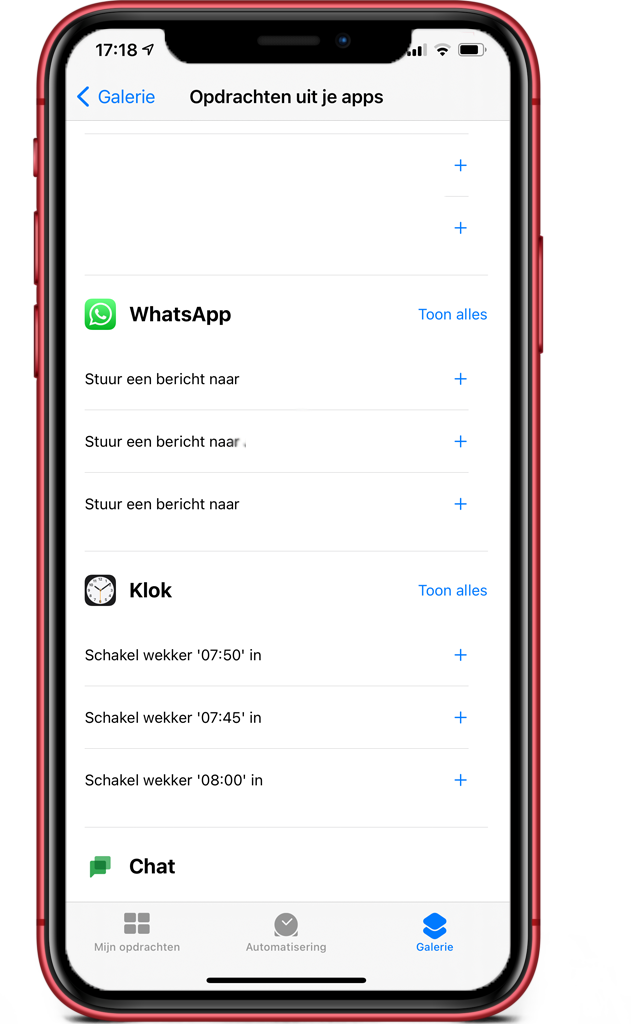
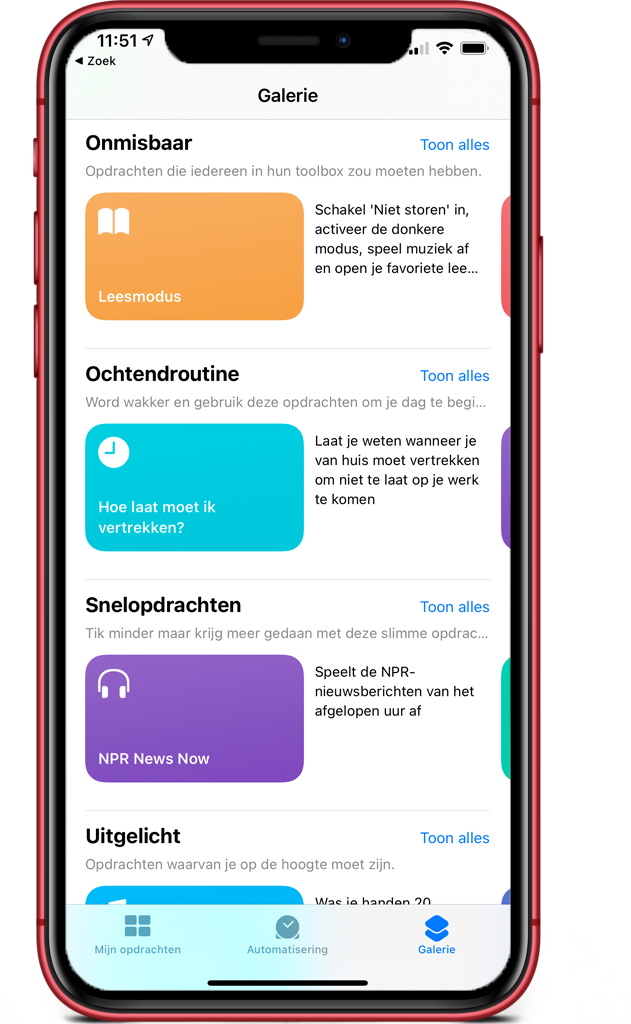
With the
Commands
app create shortcuts. This allows you to have your iPhone perform a specific task at the touch of a button. First of all, check out the app; it’s on your iPhone by default.
This is an example of an assignment you can set when you go home:
- Your iPhone plans your train ride home.
- Your iPhone sends a message to your partner or roommate with your arrival time.
- Your iPhone turns on your favo podcast.
Do you now understand a little bit what you can do with the
Assignments
app can? Let’s start simple. This is how you set a command to turn on your alarm clock:
- Go to
Assignments
and at the bottom right of your screen choose
Gallery
. - Scroll down and click at
Commands from your apps
on
Show all
. - Do you use an alarm clock on a daily basis? Then you see in this menu the
Clock
app with your most frequently used alarm clocks. Click on one you want to set. - Enter:
If I say
(e.g., “Activate alarm clock”) and click
Add to Siri
. You can now activate the command by speaking this phrase to Siri. - You can also place the command on your home screen (between your apps). To do so, go to the bottom left of your screen to My assignments and scroll to the command you just entered. Instead of clicking on the assignment, click on the little circle with the three white dots (top right of the assignment).
- Click again on the little circle with the three white dots. Click on
Put on home screen
. You can now change the icon and title, if necessary. Satisfied? Click on
Add
. The assignment is now on your home screen. - Do you click on this assignment? Then your alarm clock is automatically turned on.
Have you gotten the hang of it? Then let’s try the sample task from the intro of this tip:
- Go to
Assignments
>
Gallery
. Scroll down and under the heading select
Indispensable
for the assignment
What time at home
. - Now configure your assignment. Enter everything the app asks for.
- If all goes well, the command now works. Add it to your home screen in the same way as explained in the previous step-by-step.

You can enter endless commands and program yourself. Learn more about the
Assignments
app?
Check out this video
for more inspiration!
#14: Set widgets
Having these “blocks” on your home screen and in your Widget Library gives you a quick overview of your frequently used apps.
Here’s how to put widgets on your home screen:
- Hold down any app for a few seconds and click on
Change home screen
. The apps will now vibrate. - Click on the + at the top left. A number of Widgets will now appear for you to choose from.
- For example, add
Memories
add; this way you have a quick overview of everything you still need to do. Or choose Weather; then you are always aware of whether to put on a coat, or not. You can also go for Spotify choose if you listen to music often. Or something else, you can choose!

Your Widget Library is also super handy. Here you can put widgets that you don’t need to see on your home screen, but that you want to have easy access to:
- On your home screen, swipe all the way to the left. You will now enter your Widget Library. Scroll down and click
Edit
. - Via
Customize
you can add additional Widgets. I have chosen for example
Rain Alarm.
I can always check if it’s going to rain! I also added
Bonus card
(from the Albert Heijn app). Then I don’t have to look for it at checkout anymore. - In addition, you can also add Apple’s standard Widgets in this library. You can find these under the + sign. For example, choose
Clock
or
Battery
.

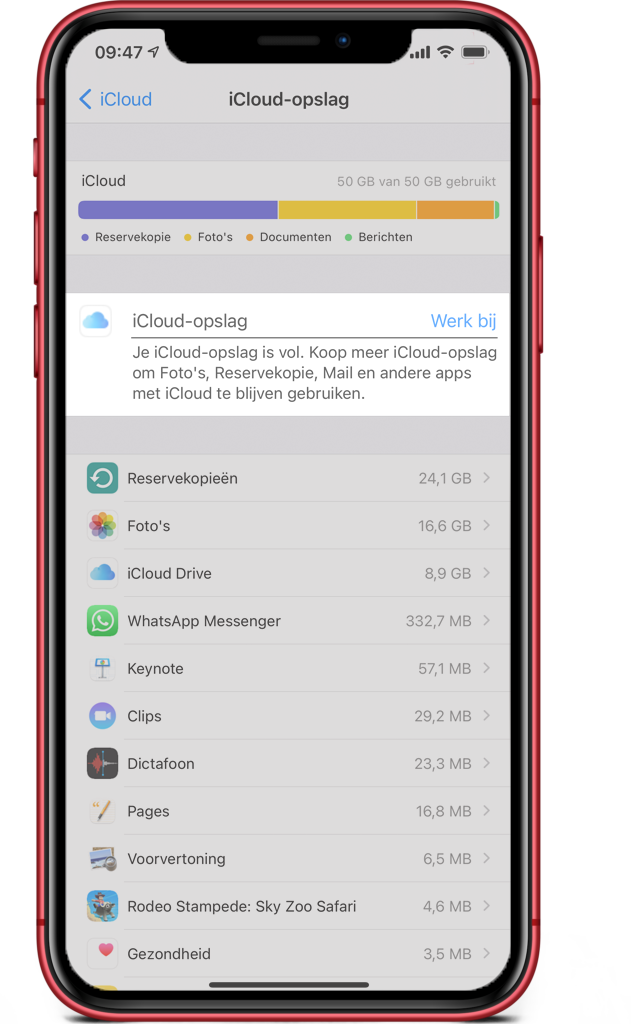
#15: Consider using a cloud backup system
I myself have been a loyal user of Apple’s iCloud for years. Have you never considered a cloud backup system? Then I would ask you to think about that anyway. For example, you prevent unwanted loss of all your data when your iPhone crashes.
What does a cloud backup system do? It syncs your data (for example, your photos and contacts) with the cloud. This ensures continuous backup. Examples of this type of system are Google Drive, Microsoft OneDrive, Dropbox or Stack. Here’s how to use Apple’s iCloud:
- Go to
Settings
and click on your name at the top (make sure you are logged in). - Go to
iCloud
. By default, Apple gives you 5GB of iCloud storage. That’s probably too little. So you’ll want to upgrade that. - Go to
Manage Storage
and
Change storage subscription
. Choose the 50GB option. This will cost you $0.99 per month.
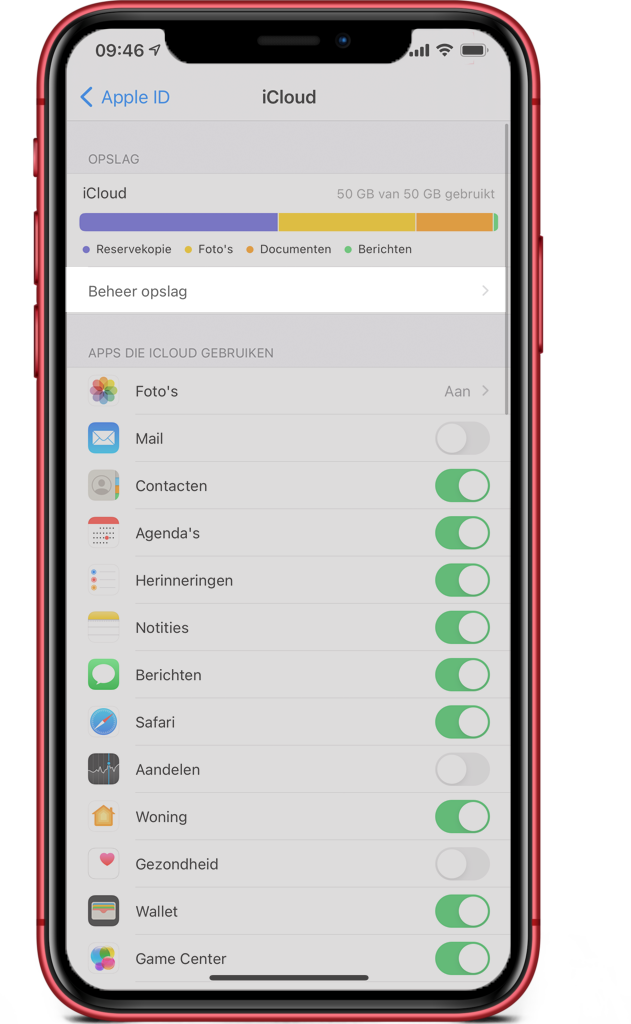
This is top notch about iCloud:
- You can access your data via iCloud.com on another device (even if it’s not from Apple!).
- Do you use multiple Apple devices such as a MacBook or an iPad? Provided you turn this on, all your devices will be connected. A photo on your iPhone is also directly on your MacBook and vice versa.
And here’s what you need to pay attention to:
- Make sure you choose a strong password for your Apple ID or else hackers can get to your personal data!
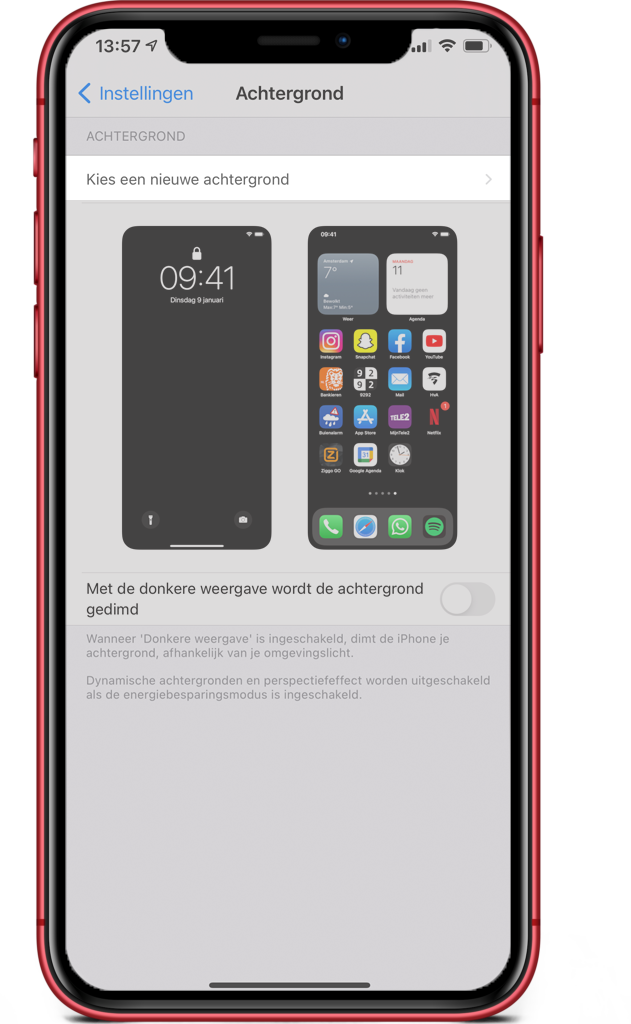
#16: Consider making your iPhone (occasionally!) primal boring
In this step, we explain how to filter out colors. So that you transform your iPhone from a glittering, brightly colored toy to a dull black brick. Think of this as a last resort. For example, when you feel addicted to your iPhone. Why does this work? Colors cause your brain to be stimulated. First, make your access and home screen sleepy:
- Go to
Settings
>
Background.
- Click on
Choose a new background
. - Click on
Still
and scroll down. Choose the all-black background. - Choose
Set
and choose
Both
.
Do you want to go one step further? Then consider (temporarily) setting your screen to black and white:
- Go to
Settings > Accessibility
. - Choose for
Display and text size
>
Color filters
. - Turn on the switch at
Color filters
. Your screen now turns black and white. - Want to turn this setting off again? Then follow the above steps again but flip the switch at
Color filters
off.


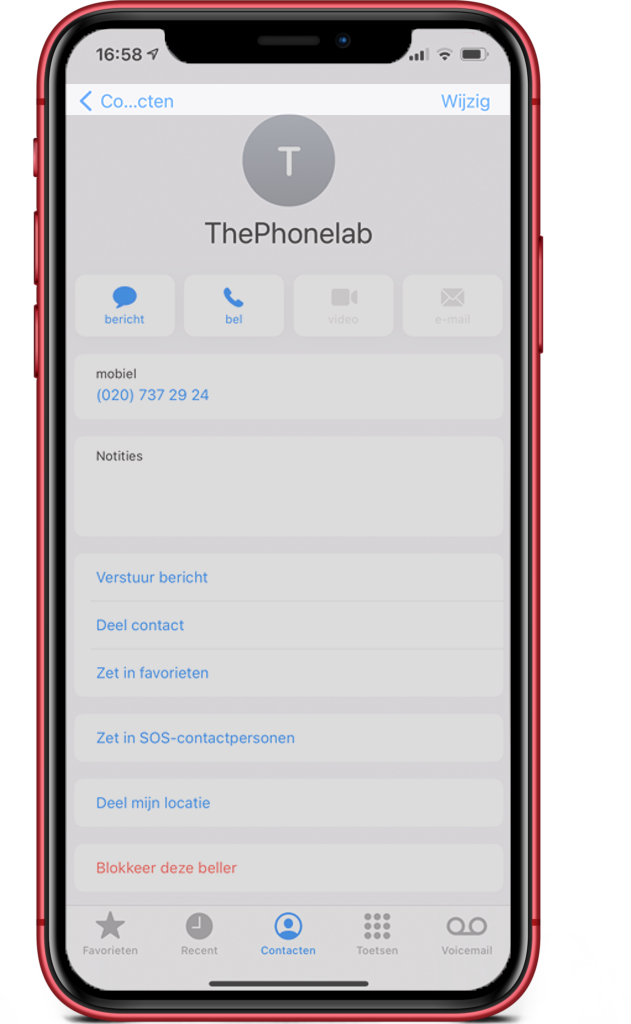
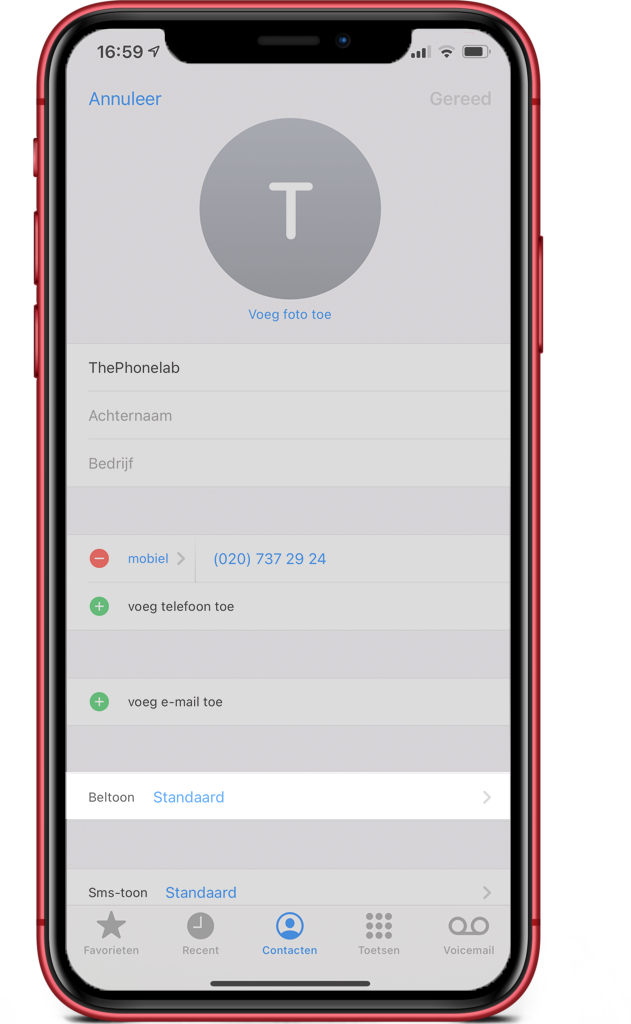
#17: Choose a ringtone per contact
That way you can hear in advance who is calling. And only then determine if you are recording ;-). You set it up like this:
- Go to
Contacts
and choose a contact whose ringtone you want to change. - Click on the top right
Edit
and click on
Ringtone
. This is now set to
Default
. - Choose another ringtone of your choice and click on the top right corner
Done
. Now click on
Done
.
These tips & tricks you’ll want to know to regain control of your iPhone:
#18: Swipe down for the search function

Just open the search function and never again spend unnecessary time searching for apps, notes, documents and more.
Personally, I mainly use this feature to search for apps. It’s much faster than scrolling through your home screen or App library! But you can do even more with it. For example, the search function returns Siri suggestions. This is your good friend Siri keeping track of what you’re doing on your iPhone – and previewing some of your favo apps. This way you can easily navigate to any of your frequently used apps.
The search function at the top of your screen allows you to search your iPhone. You can search for this, for example, with this function:
- An app
- A contact
- Something on Google by clicking on the Safari icon
- Files
- Memories (from the Memories app)
- Notes (from the Notes app)
- Or search in apps, such as:
- Messages
- Settings
- Calendar
- App Store
- Maps
#19: Swipe from top to bottom for your Message Center

This is how you open the Notification Center and get an overview of all your notifications.
You only see notifications in your Notification Center from the apps for which you allow Notification. How to turn this on or off can be found here.
Notifications, from Whatsapp for example, appear on your access screen. When you unlock your iPhone and lock it again after use, the notification is gone. Want a quick overview of all the notifications you’ve received later? Then open your Message Center. This offers you some peace of mind: then you don’t have to respond immediately to an app. But can you still find all your notifications in a row later.
#20: Use the control panel
By using the control panel, you can switch more quickly in frequently used settings on your iPhone. You can even decorate it to your liking!
This is how to open the control panel
First, go to your home screen (where your apps are).
- Do you have an iPhone without a home button (iPhone X and newer)? Then swipe down from the top right corner of your screen. To close the control panel, swipe up from the bottom of your screen. You now return to the home screen.
- Do you have an iPhone with home button (iPhone 8 series and older)? Then swipe down from the bottom of your screen. To close the control panel, swipe down or press the home button. You now return to the home screen.
This is how your control panel works
Do you know the control panel like the back of your hand? Then skip the explanation below and immediately check how to set the control panel to your liking.
At the top left, you will see a square containing four options:
- Enable and disable airplane mode.
- Turn mobile data on and off.
- Wi-Fi on and off.
- Bluetooth on and off.
Hold your finger a little longer on this square? The square now enlarges itself. Two additional options pop into your screen:
- Enable and disable AirDrop.
- Enable and disable personal hotspot.

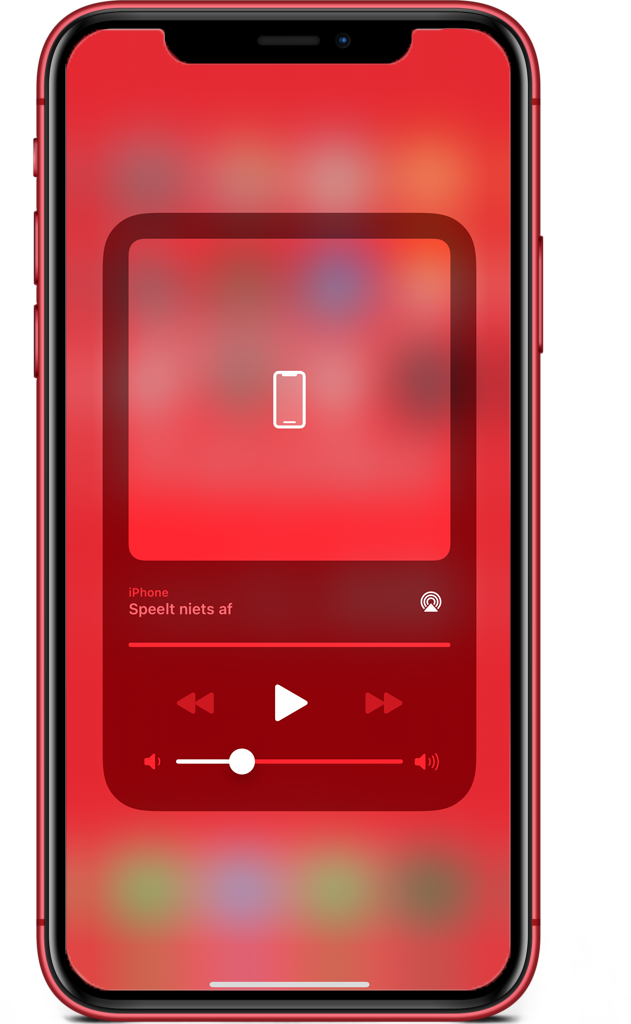
At the top right, you will see a square containing a music player:
- This states
Does not play anything
When you don’t have music or video on your iPhone. Are you listening to music? Then you will see that appear here. You can use this option to quickly select the previous/next song or pause your music. - You can also use the icon at the top right to quickly switch to another output, such as a box you are connected to.
Are you playing something? Then hold down this square a little longer:
- The music player now gets bigger. Clicking on it again automatically switches to the app on which you play the sound.
Below that you will find (first from the left) an icon with a key and with a circled arrow around it. This is your portrait orientation lock:
- Turn this option on and your screen will no longer tilt automatically when you use it in landscape or portrait orientation.
On the right is a half-moon (second from left). Enables the do not disturb mode:
- Want to know what the do not disturb mode is and how/or when to best use it? You read it here.
Hold this icon a little longer and you will get several options:
1 hour
,
See you tonight
and
Until I leave this location
. Choose an option of your choice to automatically disable your do not disturb mode again.

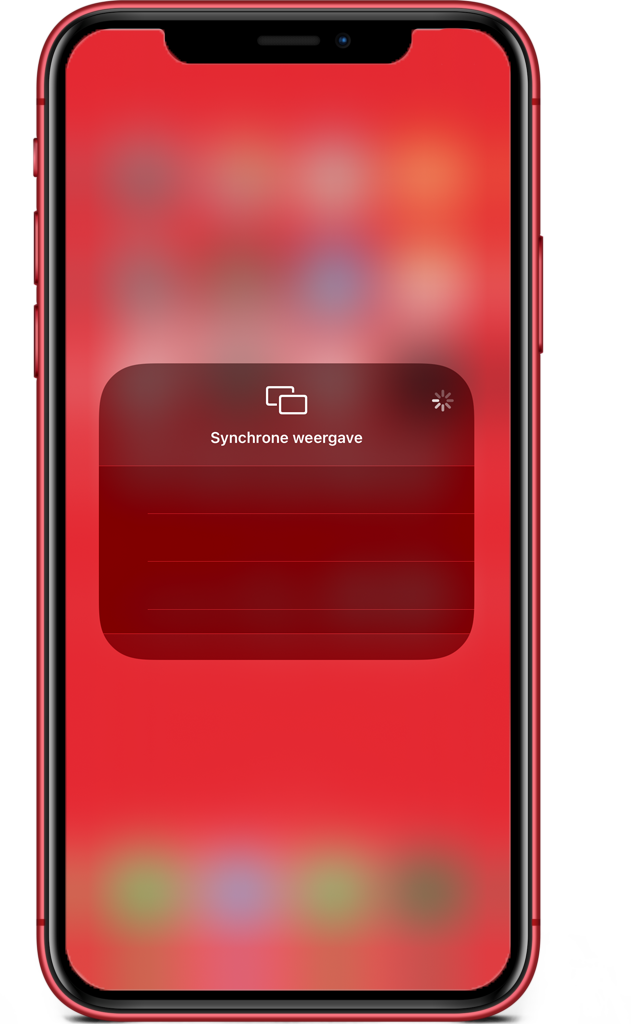
Under these two icons you will find:
- Synchronous display. You use this feature to quickly connect your iPhone to your Apple TV. Don’t have an Apple TV? Then you can ignore this option.
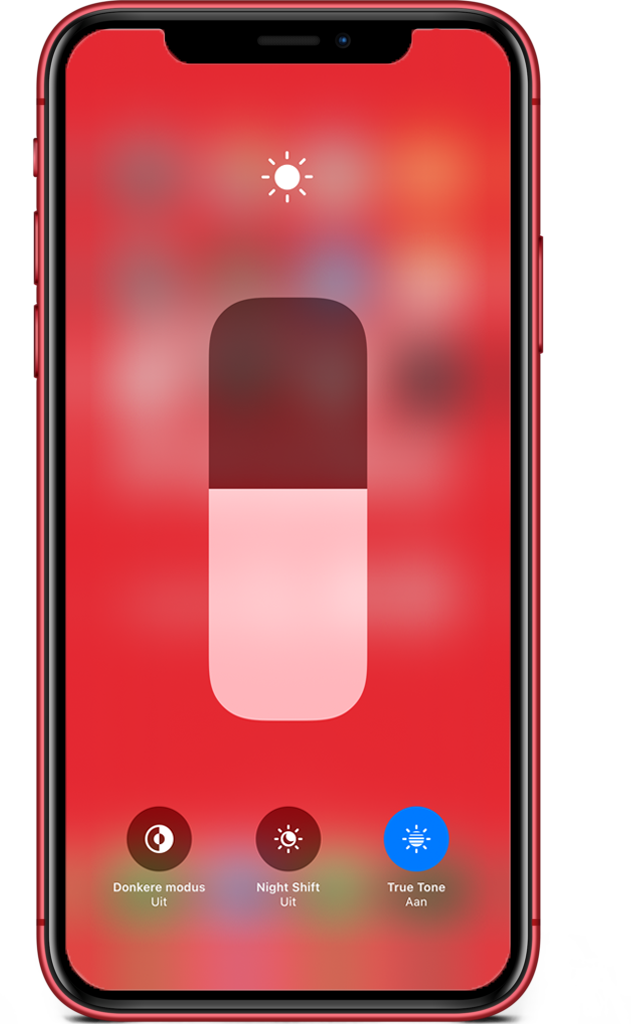
Now we slide a little to the right. Here you will find two vertical bars:
- With the left bar, you adjust your brightness by swiping down and up on the bar. Hold down this bar a little longer and you can
Dark Mode
,
Night Shift
and
True Tone
turn on and off. - Using the right bar, adjust the volume of your sound.
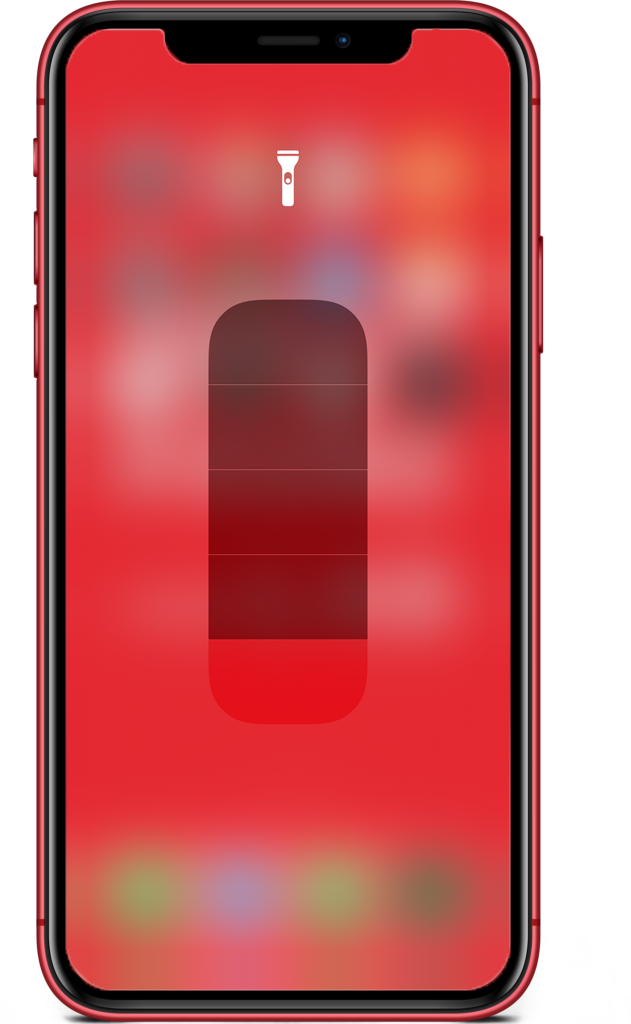
We move up another row!
- On the left you will find the flashlight. You turn these on and off by clicking on them.
Hold the flashlight for a moment:
- Adjusts the intensity of the flashlight. Swipe up and down over the bar that pops up in your screen. The flashlight now becomes (less) bright.
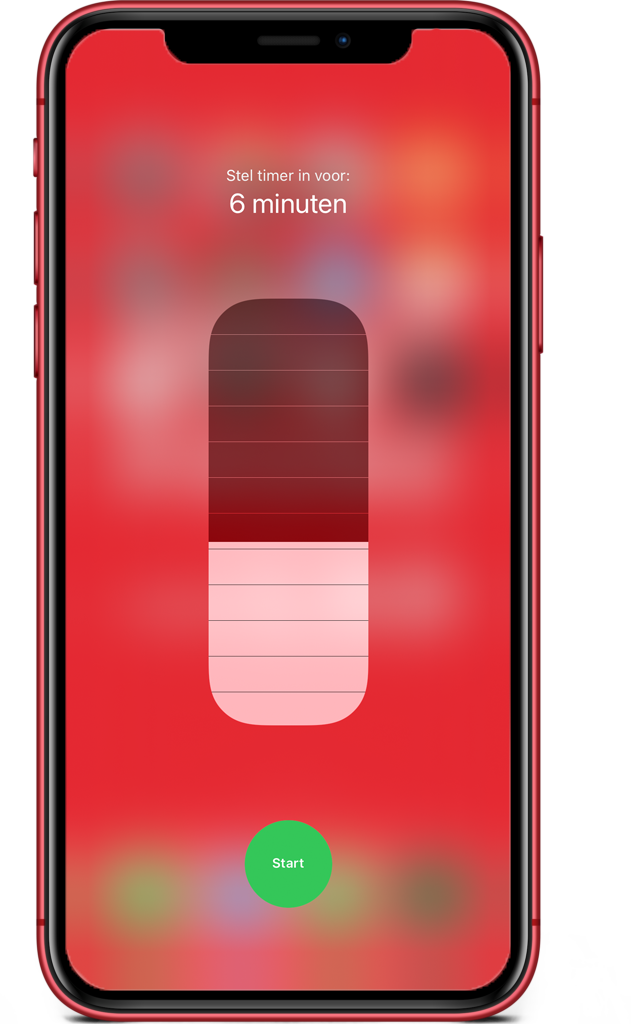
We continue to the right:
- Here you will find the
Timer
. Clicking it will switch the iPhone to the
Timer
in your
Clock
app.
Hold
Timer
briefly:
- You can now immediately set a timer. Swipe up and down to choose the correct time and click
Start
.
In the same row (second place from the right), you’ll find a solution for lack of mental arithmetic talent:
- A shortcut to your calculator.
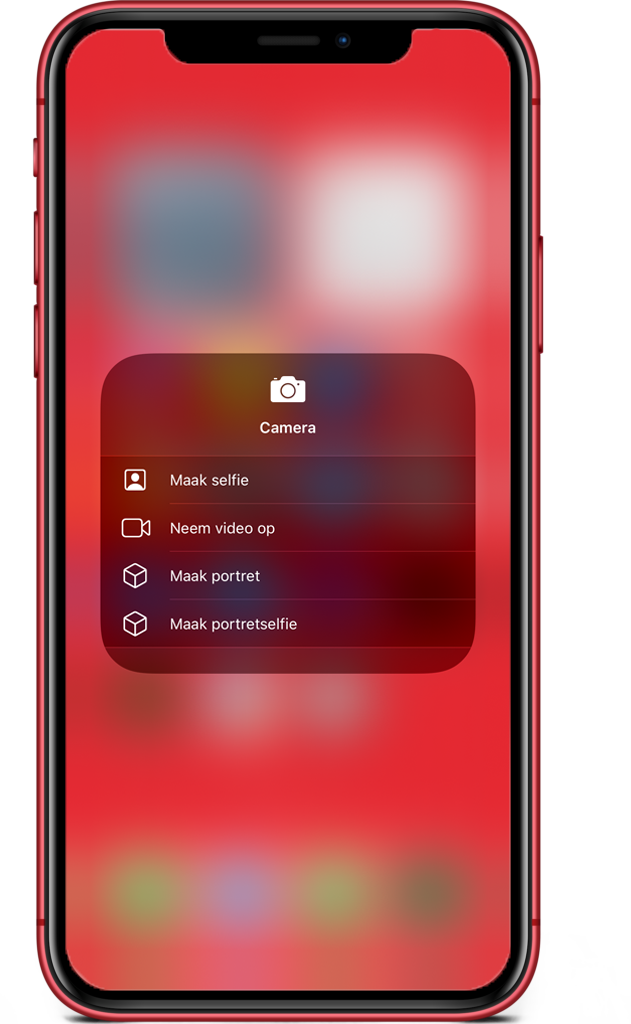
In addition, it states:
- The camera; this one speaks for itself.
Hold down this icon for a moment:
- You are given a number of options:
Take selfie
,
Record video
,
Take portrait
(if you have portrait mode) and
Take portrait photo
(if you have portrait mode).
This is how you set up your control panel
Using the standard options in the control panel already saves you a lot of time. But of course, for the true productivity guru or tech nerd, this is not enough. In fact, you can also customize the control panel to your liking:
- Go to Settings > Control Panel.
- Add controls. You do this by going under More controllers pressing the +’s.
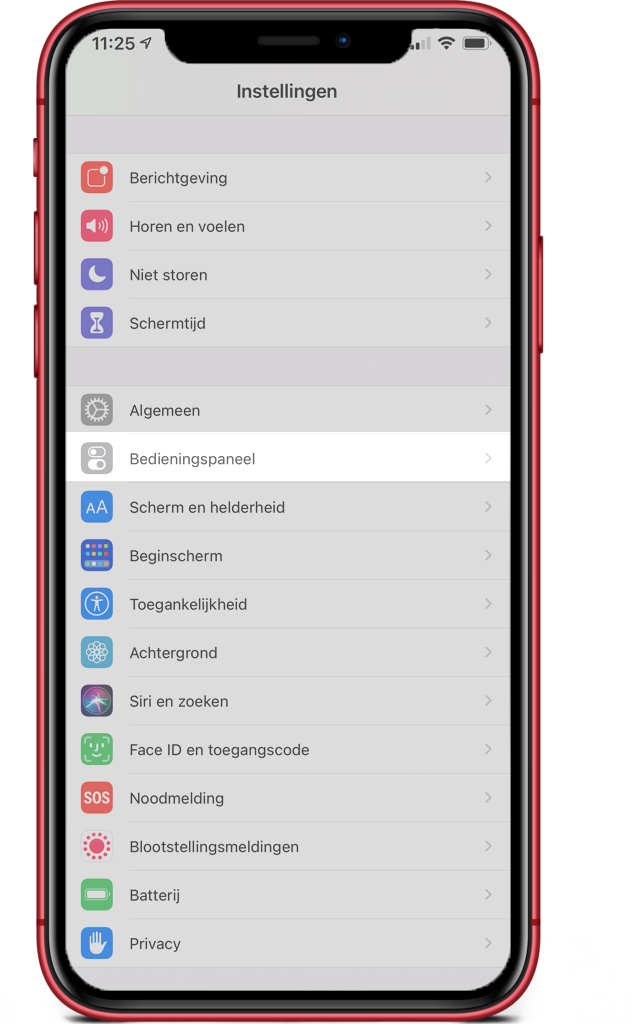
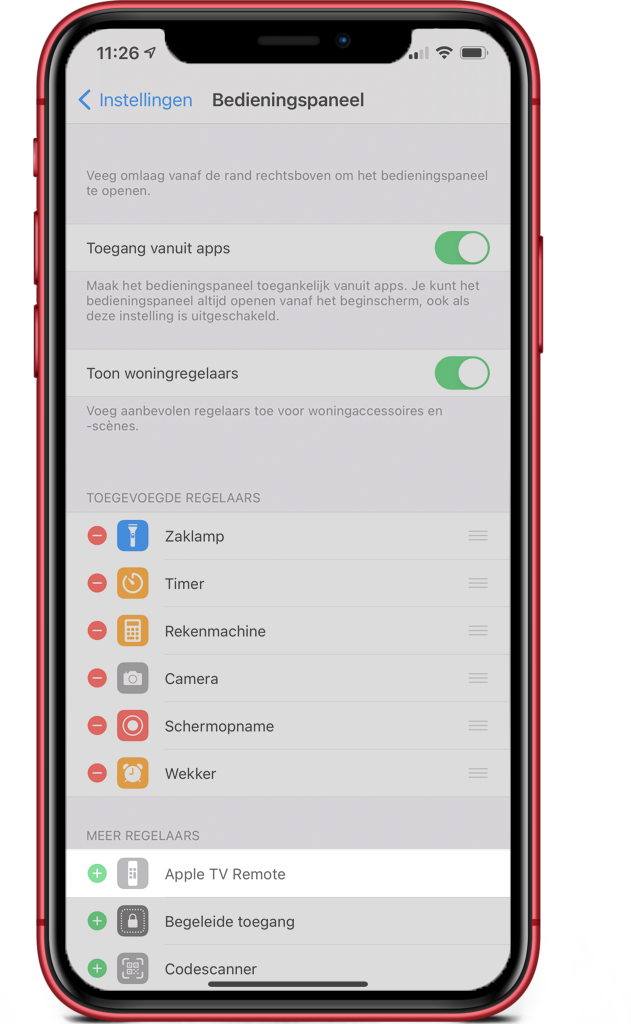
And do you want to be able to activate the control panel anytime (and not just from your home screen)? Then make sure that at Settings > Control panel the option Access from apps is enabled.
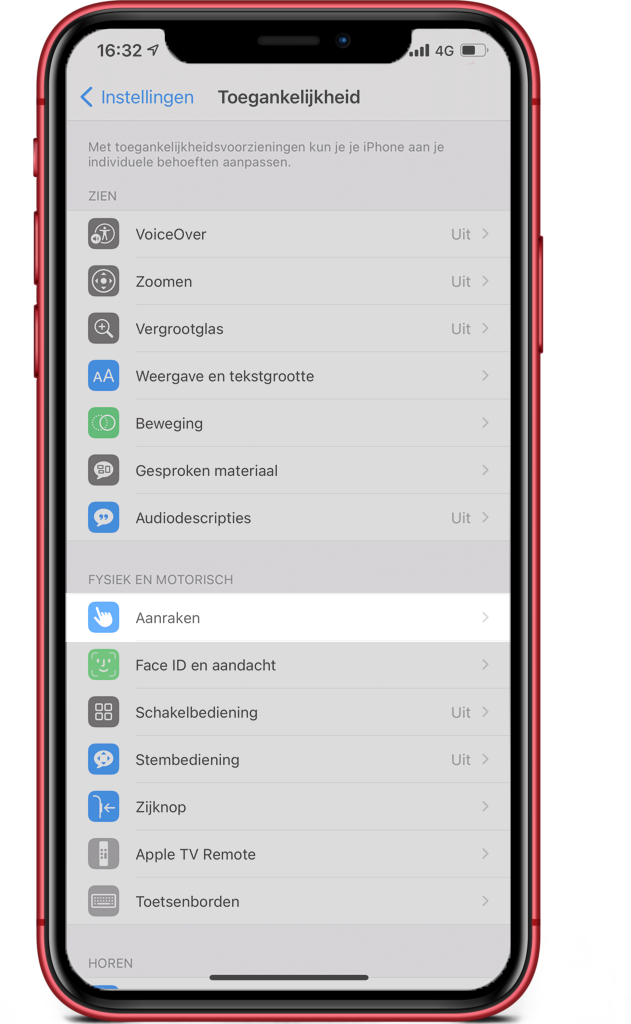
#21: Tap the back twice for a screenshot
Take screenshots faster than light:
- Go to
Settings
>
Accessibility
. - Look at
Physical and motoric
and click on
Touch
. - Scroll down, you will see here
Touch backside
. Click on it. - Click
Double Tap
and select
Screenshot
.
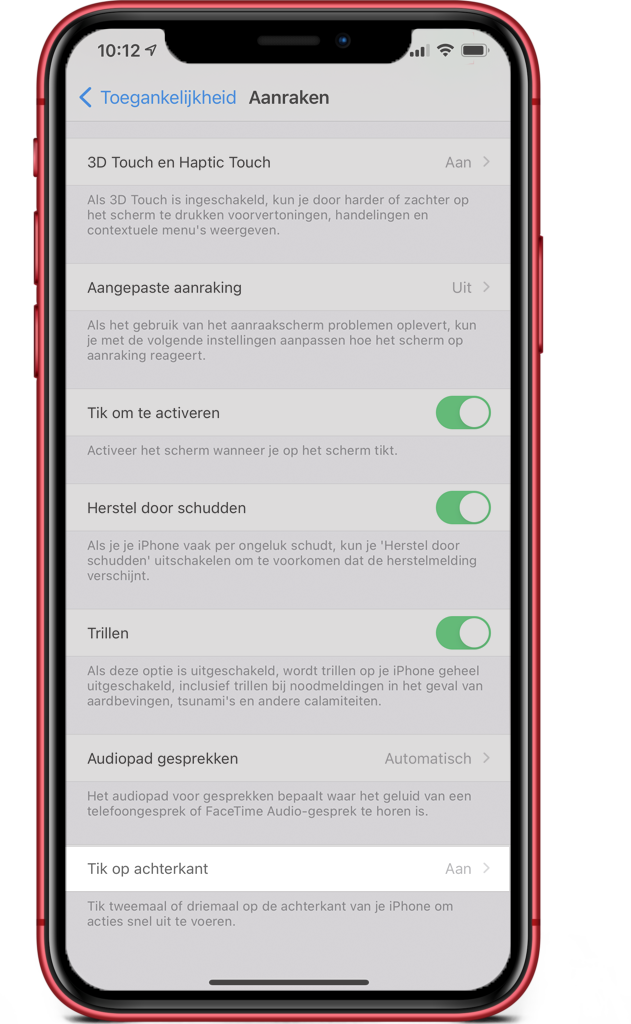
Tap the back of your iPhone twice,
et voila
, you create an image of your screen!
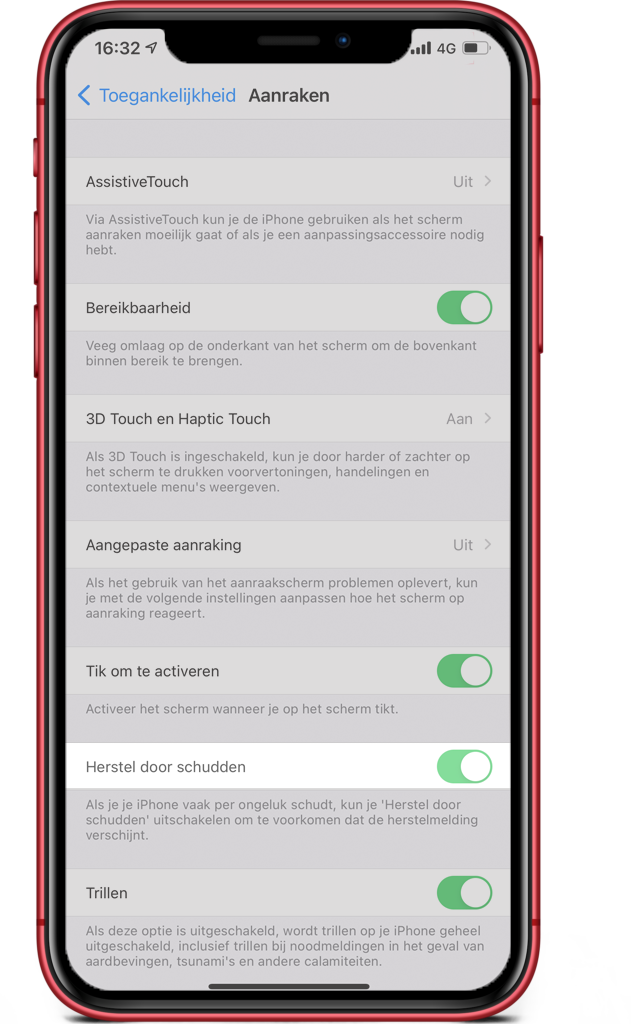
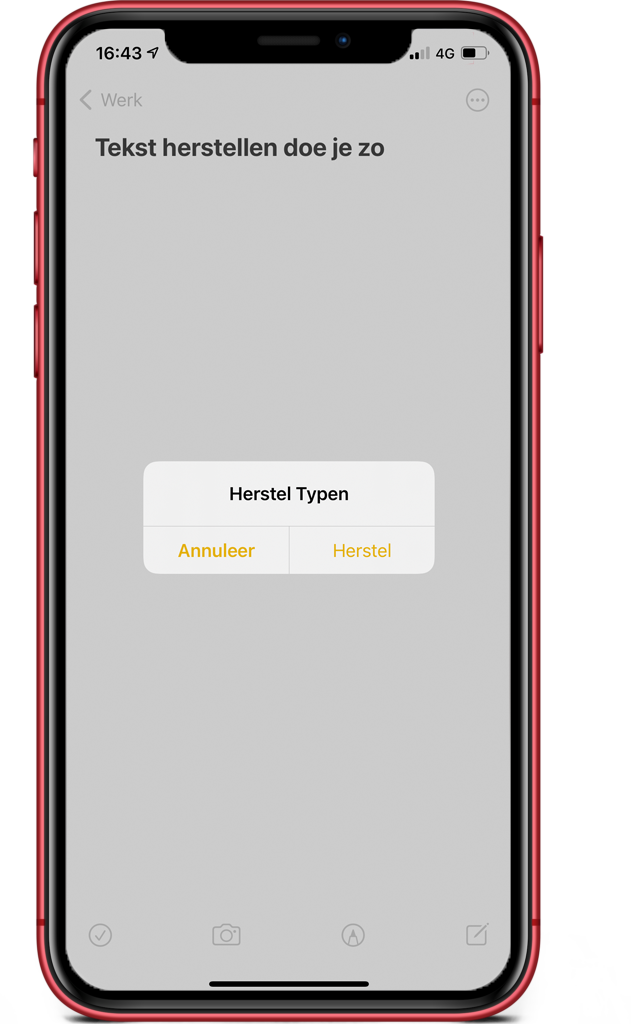
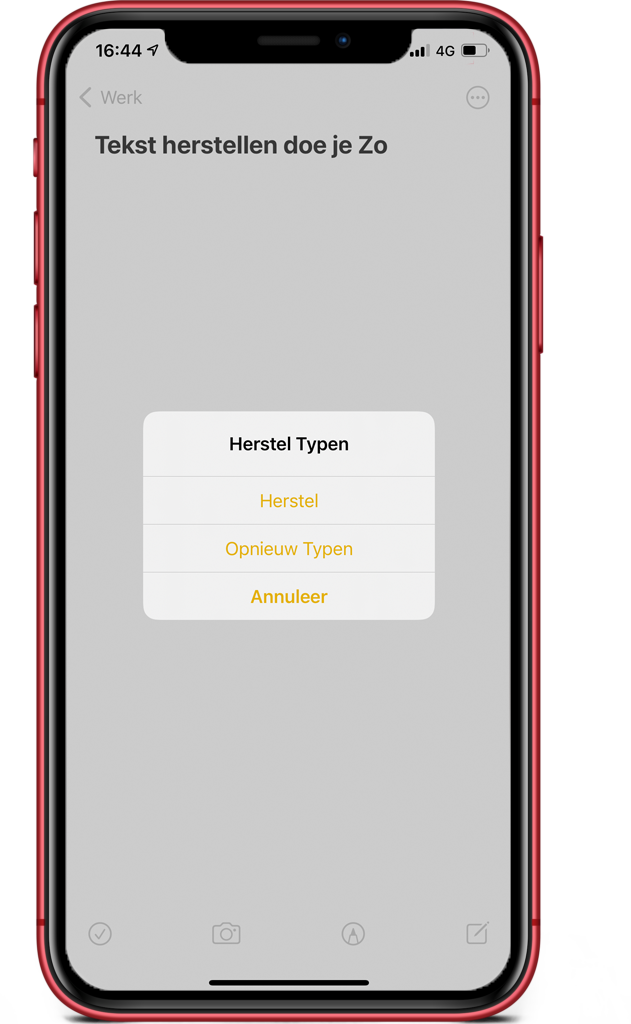
#22: Recovery by shaking
Sometimes you don’t really know what you want to say. Then you just typed a long app and you want to delete it anyway. Forget that backspace button! With this trick, it goes much faster.
The
Recovery by shaking
function is enabled by default. Is it not working? If so, check to see if this feature is on:
- Go to
Settings
>
Accessibility
. - Look at
Physical and motoric
and click on
Touch
. - Check out
Recovery by shaking
and check if the switch is on. Is it not? Then turn on the function yourself.
This is how you perform the function:
- Open an app in which you can type, for example
Notes
, and write any sentence. - Now give your iPhone a good shake. A notification will appear on your screen:
Restore Typing
. - Select
Restore
and your text will disappear like snow in the sun. - Does the iPhone delete too much text or change your mind anyway? Then shake it again. The message
Restore Typing
appears on your screen again. You can also choose to
Retype
. This will restore the text you just deleted.
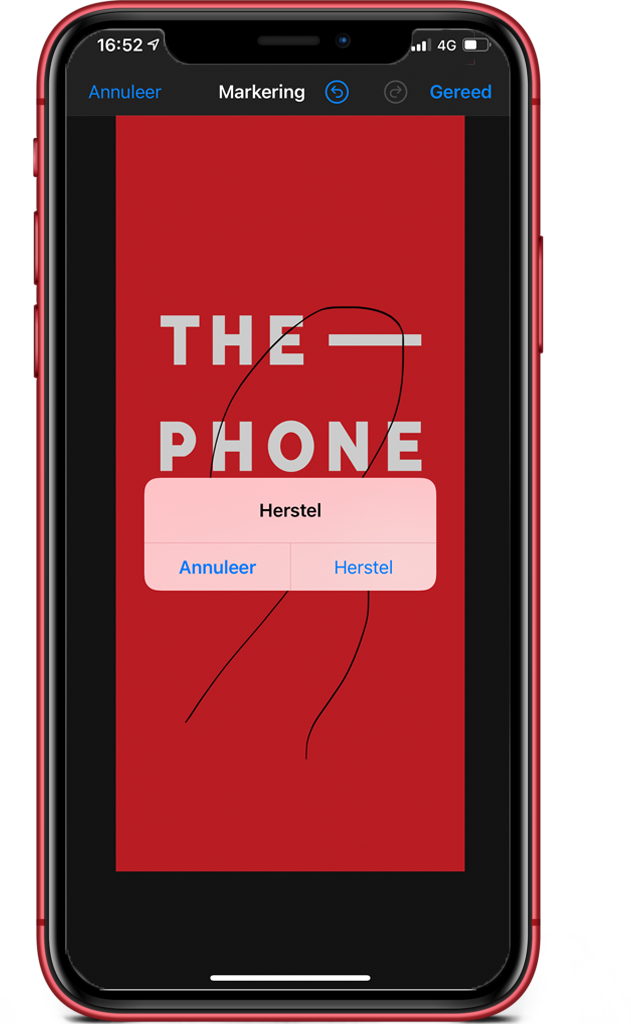
This trick works not only for text, but also when you draw something. For example, in a photograph:
- Go to your Photos and choose one. Click on Edit (top right).
- Click on a little circle with three horizontal dots in the upper right corner. You can now choose Mark.
- Scribble something nice on your screen. Shake your iPhone briefly and the Restore function reappears on the screen. You know how it works ;-)!
#23: Switch quickly between different apps
This can be done in two ways:
- Go to any app.
- Do you have an iPhone without a home button? Swipe up briefly from the bottom of your screen. Have an iPhone with a home button? Press the home button twice.
- You can now browse between your apps. Click the app you want to use.
And now: faster! Rapido, quick! This trick works only on iPhones without a home button.
- Go to any app.
- You will see a horizontal bar at the bottom of your screen. This is sometimes white, sometimes gray and sometimes black. This depends on the background color of your app.
- Swipe left and right across this bar. You now switch between your apps.
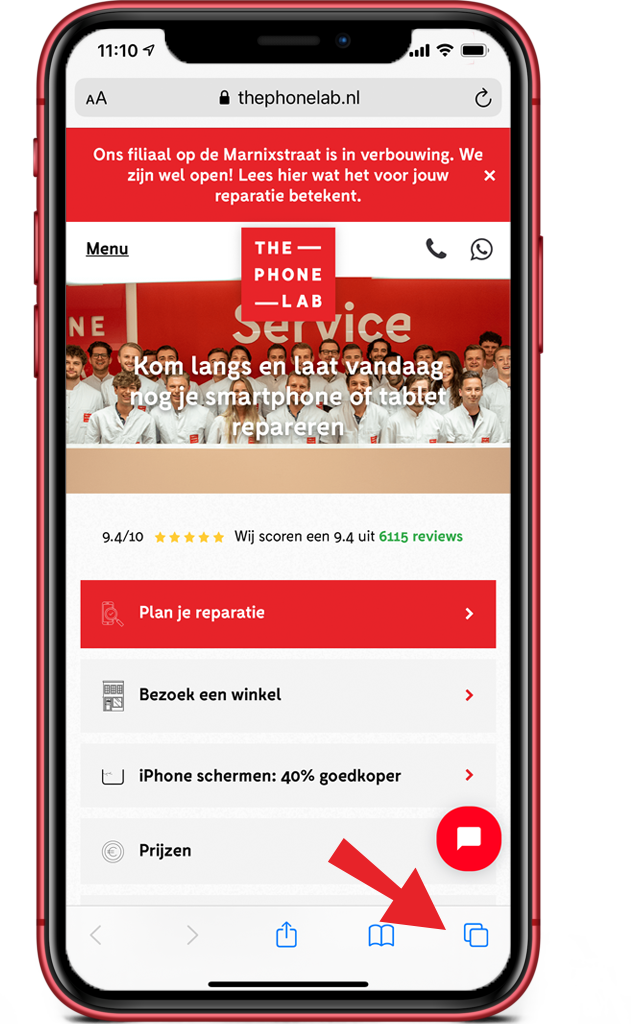
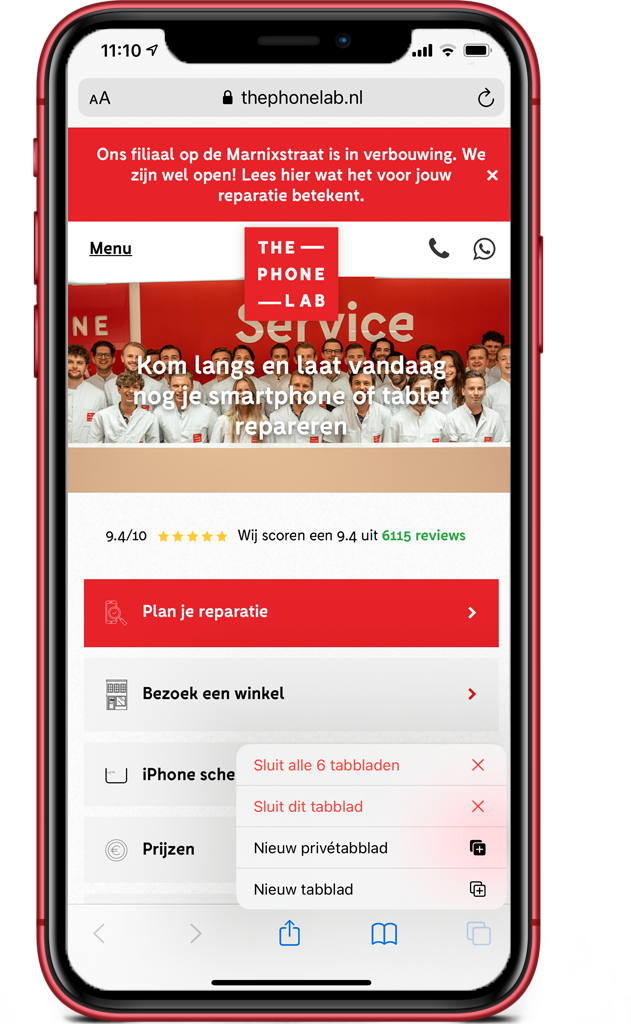
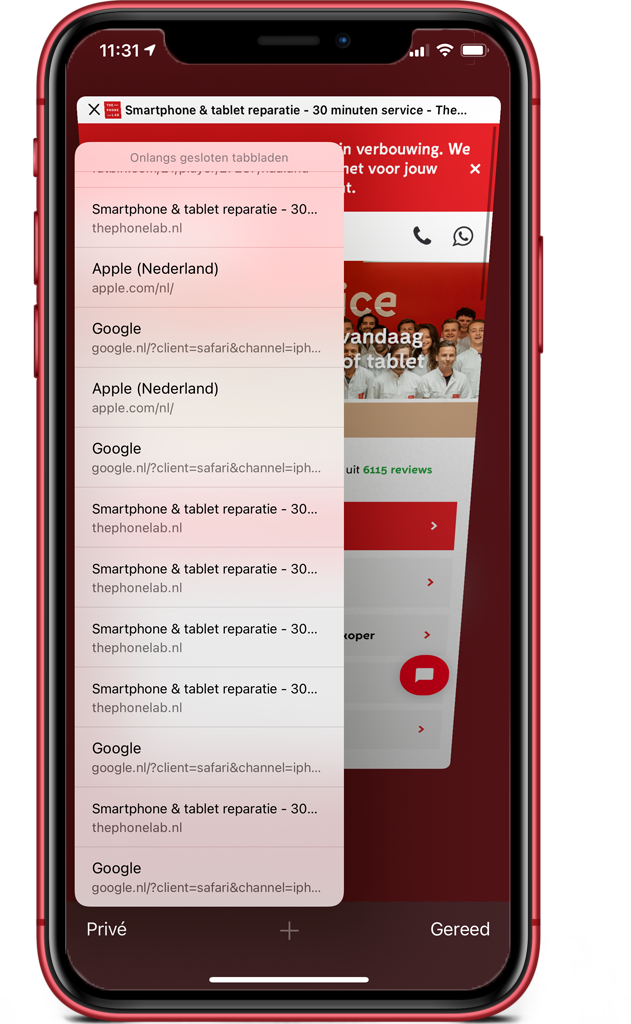
#24: Close your tabs at once (in the Safari app)
Are you one of those people who leaves tabs open forever? And then close them one by one? There is a simple shortcut for that:
- Go to
Safari
. At the bottom right, you will see an icon with two overlapping squares. This is the icon you normally click once to navigate to a list of your tabs. - Now press and hold this icon for a few seconds. A menu appears.
- Select
Close all … tabs
and choose this option again. Done!
Do you prefer to leave your tabs open because you’re afraid of losing certain websites?
No stress
, check out the following tip!
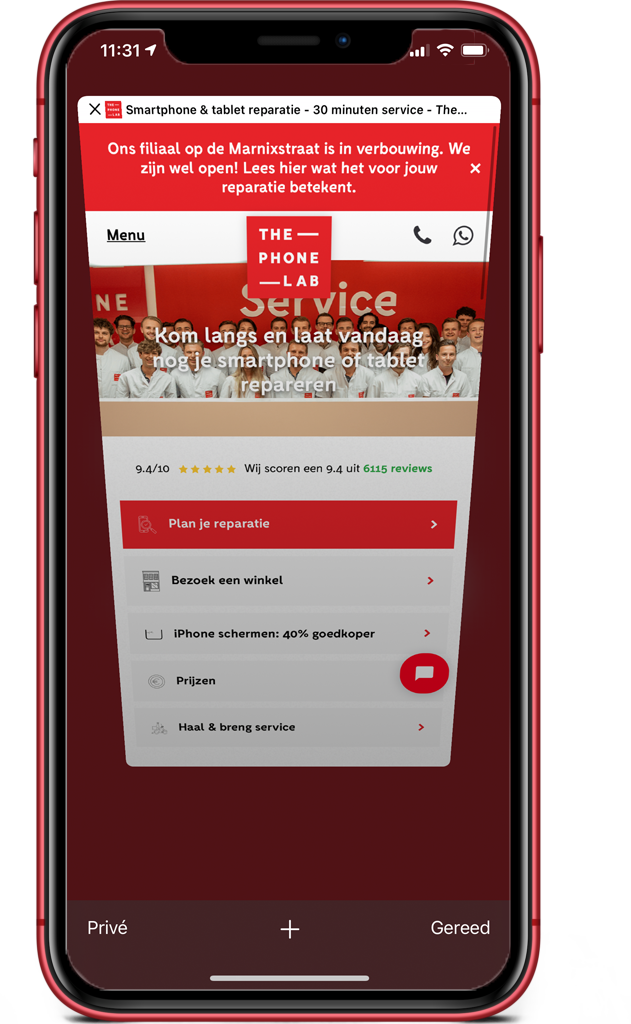
#25: Find closed tabs again (in the Safari app)
Everyone accidentally closes a tab from time to time. But you don’t want to spend unnecessary time trying to find a website. So you fix that in no time:
- Go to
Safari.
At the bottom right, you will see an icon with two overlapping squares. Click on it. - At the bottom you will see a +. This is what you normally click on when you want to open an additional tab. Now press and hold this icon for a few seconds.
- A menu appears with the title:
Recently Closed Tabs
. Here you will find a zipper of all the tabs you have recently closed. You can also still scroll up for more. - Click on the tab you want to open. The tab will now open in
Safari
.
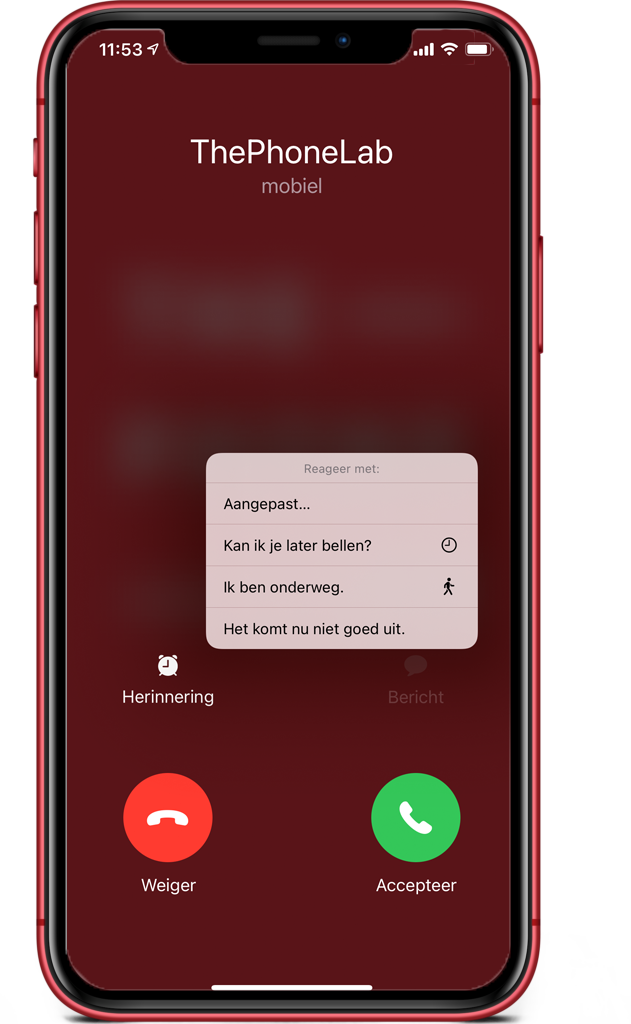
#26: Use Respond with text message
Sometimes you can’t answer for a while, and Apple offers you the option of sending a text message. It works in the following way:
- You get a call. Do not click the big, green answer button but instead choose Message.
- A Respond with: menu. Choose your desired text message here.
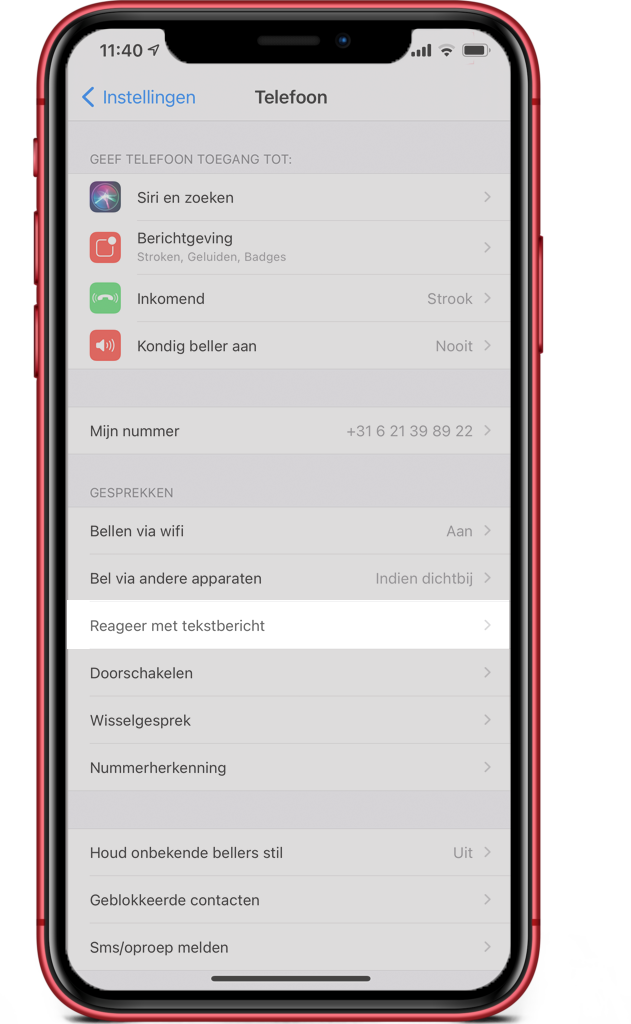
You can also set these default text messages yourself! Here’s how to fix it:
- Go to
Settings
>
Phone
. - Click on
Respond with text message
. - You will see a menu appear titled
Respond with:
- You can now customize the default options to your preference. For example, make them a little more personal or create different versions for business and personal.
#27: Skip bubbles with Remember Me Later
This is option you can click on when you get a call. So you don’t forget to call your friend, mother or boss back.
- You get a call. Instead of answering, you click Remember.
- A menu appears called Ask again later.
- You can choose: In 1 hour or When I leave. Click your preference.
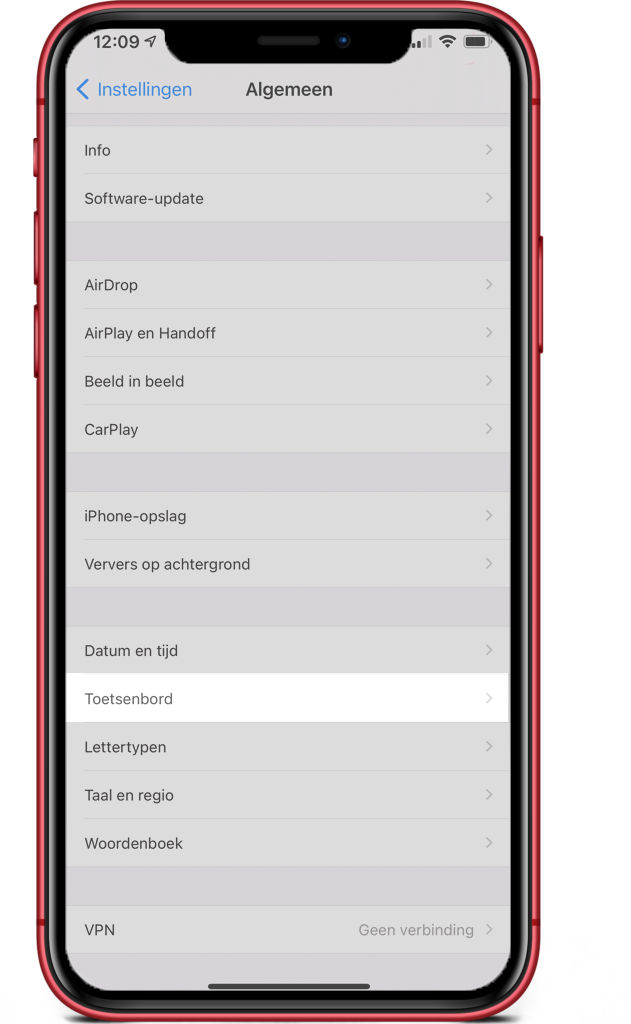
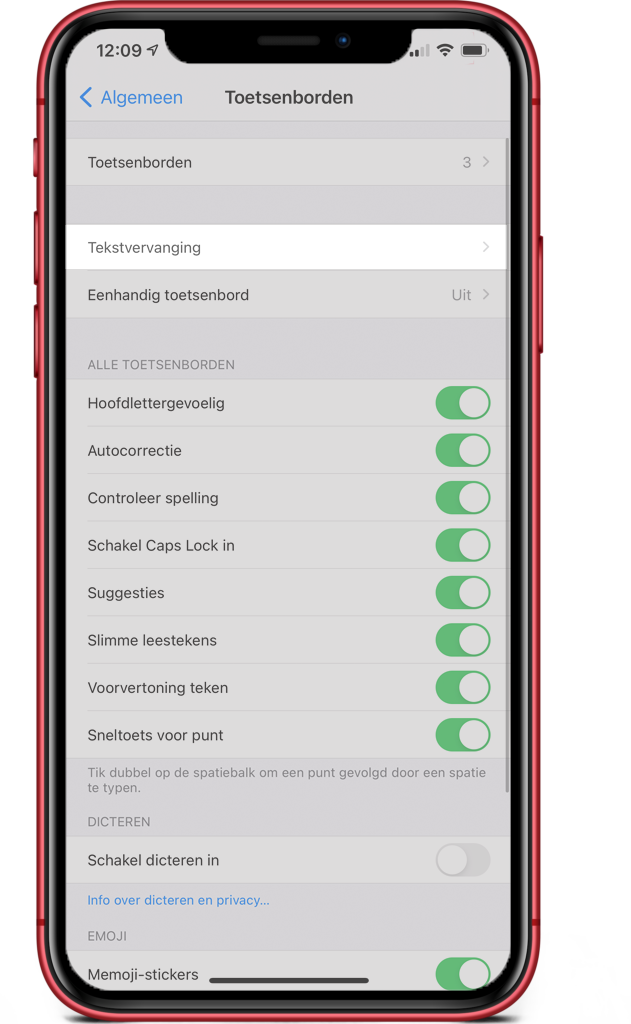
#28: Use abbreviations for Text Replacement
Some words or phrases you use mega often, for example, your address, phone number or full name. Using an abbreviation, quickly add this word or phrase:
- Go to
Settings
>
General
. - Select
Keyboard
>
Text Replacement.
- You will see here a number of text replacements are set by default. With the
Change
button you can remove them (if you want to). With the + button you can add a new text replacement. Click on it. - Choose the sentence you want to add. For example, your full name.
- Choose a keyword. This is the shortcut: when you type this, the text will be replaced for the above sentence. For example, enter your initials here.
#29: Learn to type faster
Here are some tricks that will make your app and emailing even faster!
This is how to quickly type a symbol or number
You probably now click 123 at the bottom of your keyboard, select the symbol or number and click ABC again to return to the letter keyboard. Try this:
- Hold 123 and do not remove your finger from the screen.
- Select the desired symbol/number and drag your finger to it.
- Release your finger. The symbol/number now appears in your text and you return directly to the letter keyboard. You can continue typing now!
That way you don’t have to type at all
Even easier: letting your iPhone do the work for you. Simply by speaking into it:
- Click on the microphone icon at the bottom right.
- Now say what you want to say and click on the keyboard icon again at the bottom right.
- Your text now appears on the screen.
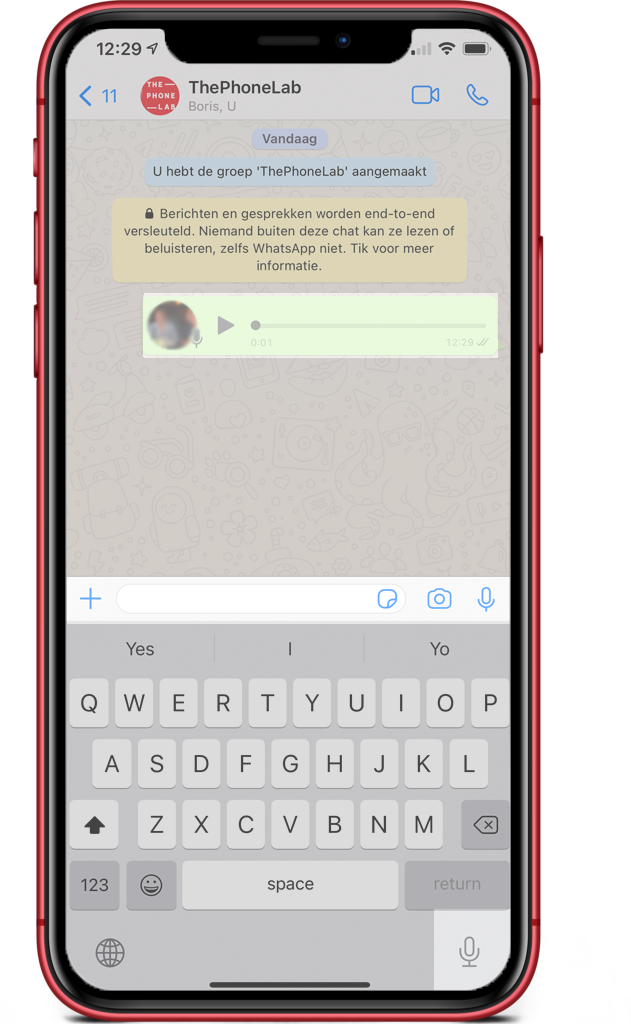
Want to type faster on Whatsapp? You can also send a voice memo. That’s more personal and faster!
- To the right of the text box, click on the microphone icon (note that this is a different microphone icon than in the step-by-step plan above).
- Hold down the microphone or swipe your finger upward. Now speak the voice memo.
- Release or press the blue send button. Your recorded voice memo now appears in the Whatsapp chat.
This way you don’t have to take your thumbs off the keyboard anymore
In this way, the
world speed-typing record on a smartphone
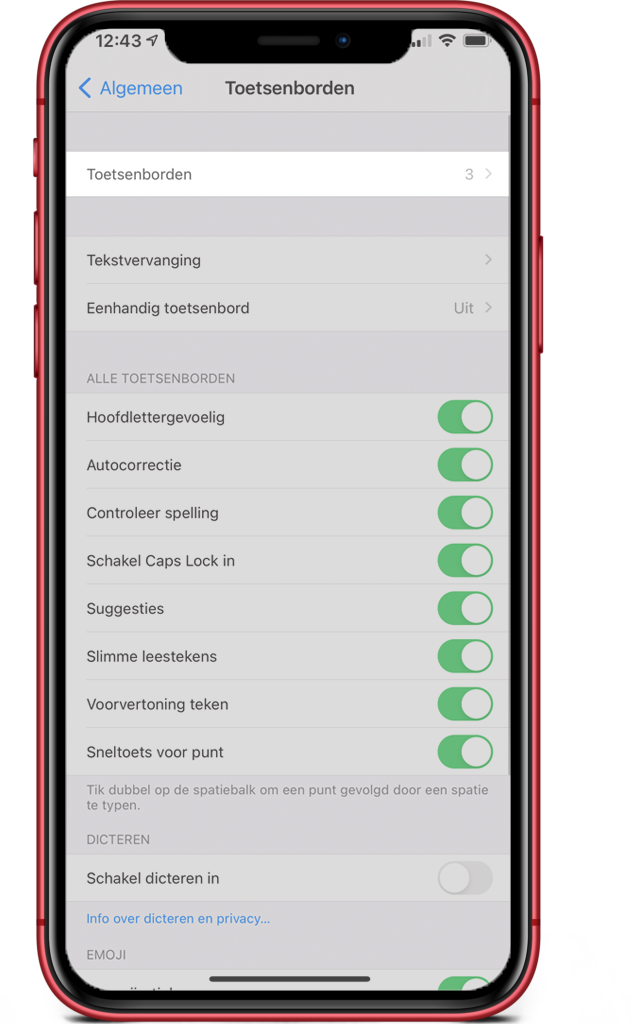
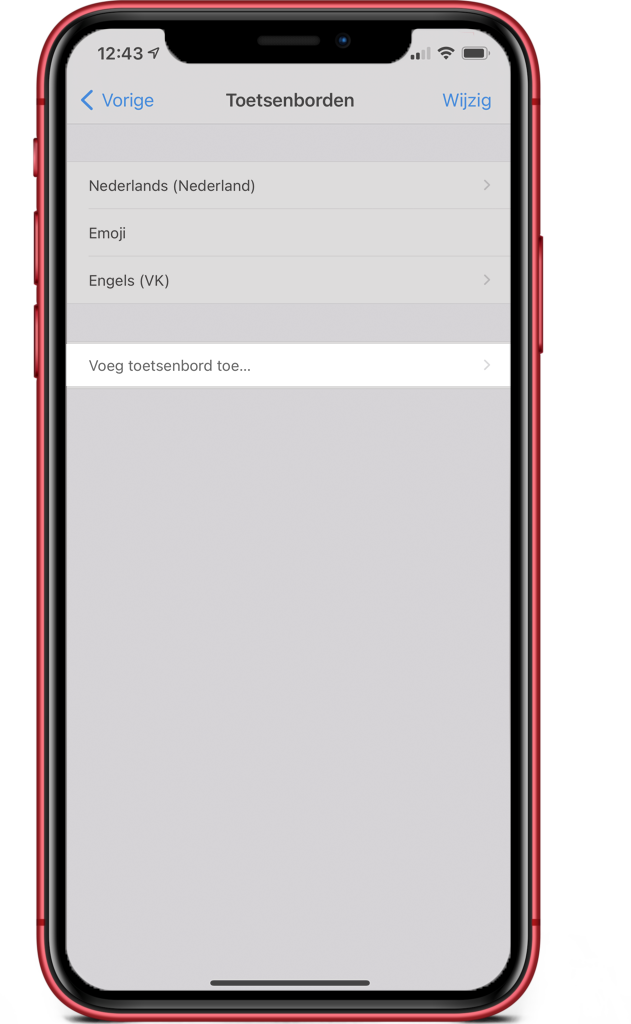
achieved. It does take some getting used to! Apple does not offer this feature in the standard keyboard. But you can install it. To do so, first download Gboard in the App Store. And then perform the following steps:
- Go to
Settings
>
General
. - Select
Keyboard
>
Keyboards
. - Choose
Add keyboard…
- Click on
Gboard
. Note: so be sure to download the app first! Otherwise, this step will not work yet. - Click again
Gboard
and activate
Give full access
. - Now delete your other keyboards. Also your smileys (Emoji), as these can also be found in the Gboard. And don’t worry, you can add them again later (via Add keyboard… as Gboard don’t like).
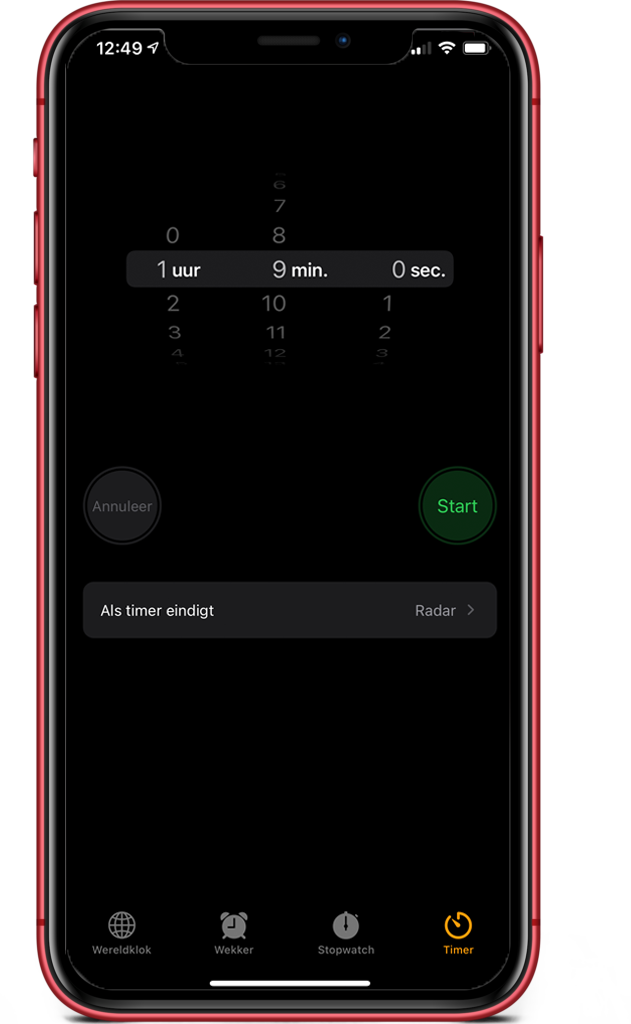
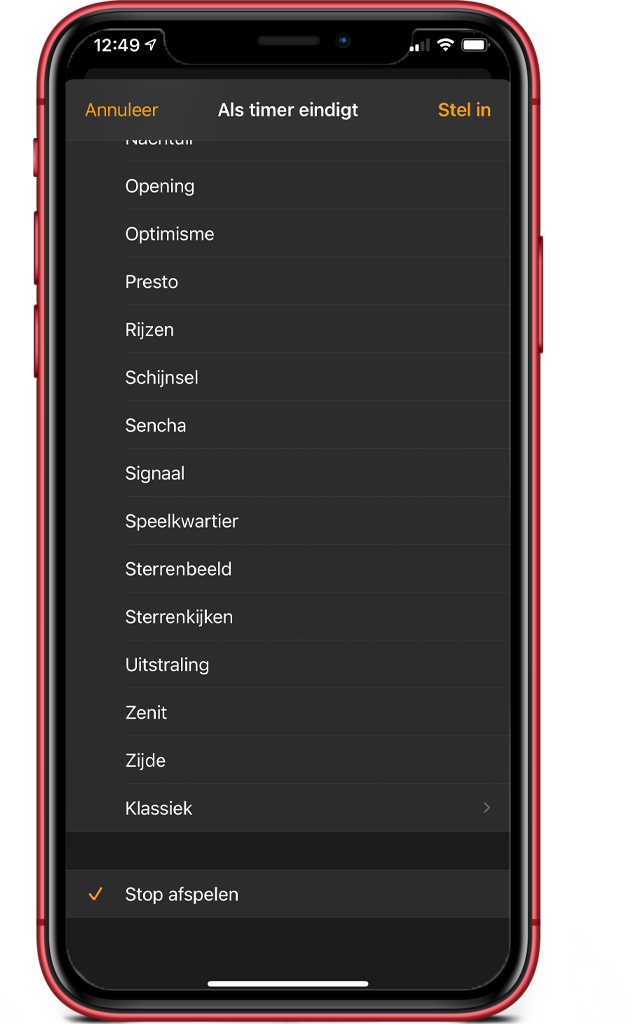
#30: Stop playback with the timer
This way, you can turn off your music/Netflix/YouTube after a certain number of minutes. For example, useful when you go to sleep, want to take a limited number of minutes break or set in advance how long you are going to run. You fix it like this:
- Go to
Clock
and select the bottom right on the
Timer
. - Set the timer to a desired number of hours, minutes and seconds.
- Click
When timer ends
and scroll down. Choose
Stop playback
. - Now click on
Start
.
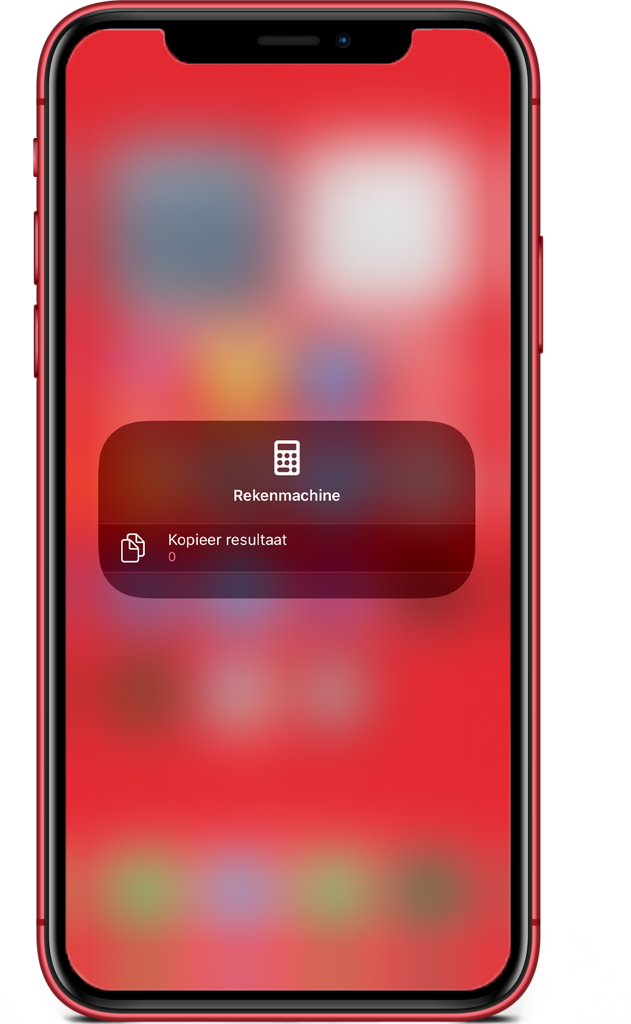
#31: Swipe into Calculator for backspace option
How many times have I started over to calculate something in the
Calculator
app because my big, fat thumb typed in the wrong number? I think more than a hundred times! With this trick, that’s a thing of the past:

This is how to fix a typo in the Calculator app.
Background info: how am I affected by my iPhone?
Researchers still do not always agree on this topic. But you’ve probably noticed for yourself that your iPhone is getting in the way of your productivity. You get distracted by notifications and in addition, you have trouble putting your iPhone away. That’s because it creates little moments of happiness: that message, that like or that news app that quiets your hunger for current events cause happy chemicals, such as dopamine, to enter your brain. Logically, you just want more of that! This will make you pick up that iPhone faster next time you get a notification. Your emotional brain is looking for a shot of dopamine hiding in the notifications on your access screen. You could say we’re all secretly a little smartphone addicted: iPhone junkies looking for their next shot.
Okay, I hear you thinking (and I agree): nice and dramatic. But you probably can’t deny that your iPhone occasionally causes you to get less done. And that you might go a little crazy with that feeling of always having to be “on”. You just lay back in your easy chair, another notification pops up on your screen. Pretty fascinating, right?
Hence, we felt it was important to write this piece. An iPhone (or other smartphone) can actually be a great tool! If you set it up and use it the right way, it will help you move forward – instead of working against you. In terms of productivity, efficiency and working smarter.
-
What iPhone settings should you adjust immediately for fewer distractions?
Start by turning off notifications, using Focus or Do Not Disturb and hiding social media apps. This will provide the fastest peace of mind and focus.
-
How do you become less addicted to your iPhone?
-
What is Focus on iPhone and why is it important?
-
What iPhone settings help you become more productive?
-
How do you set your iPhone to sleep better?
-
What are the best apps for productivity on iPhone?